
Every once in awhile, you have a meal you know you’ll never forget. Today was one of those days.
It’s Chicago Restaurant Week, a dream for foodies and anyone with a self-professed obsession for trying high-quality food at half (or sometimes, less than half) the price. There were close to 300 restaurants participating in Restaurant Week, so it was difficult to narrow down my choices.
But then I saw the menu for Naha, and the decision seemed less complicated. I have been hearing buzz about Naha since before I moved to Chicago, but I could never muster up the $60 plus dollars it would take to enjoy a meal there (that’s perhaps a conservative estimate?…).
However, when I saw they were offering a $22 prix-fixe, three-course menu, it seemed too good to be true. As did the choices for each of the three courses; sometimes, restaurants participating in restaurant week tend to stick to the basics. A simple filet of salmon, a starter salad and a piece of pie fit the bill for many establishments.
Naha doesn’t skimp on quality. The menu included everything from chicken tagine scented with Turkish spices, to chocolate cremeux, a rich chocolate pudding served with meringue, caramel and cocoa nibs.
From the minute I walked in the restaurant, the host staff were friendly. I didn’t have a reservation, but they guided me and my friend Kaitlyn to an immaculately set table in the middle of the room. I had barely taken off my coat and a waiter was filling my glass with ice water.
When the bread came and I placed the napkin in my lap, I experienced something that I’ve never noticed in other restaurants; the napkin was soft. Super soft. “Blanket soft,” as Kaitlyn said. The fact that someone cared enough to select a napkin with only the highest thread count seemed too good to be true; the owners even considered how I (and the other patrons) would feel as we dabbed our mouths after consuming a massive piece of chocolate cremeux.

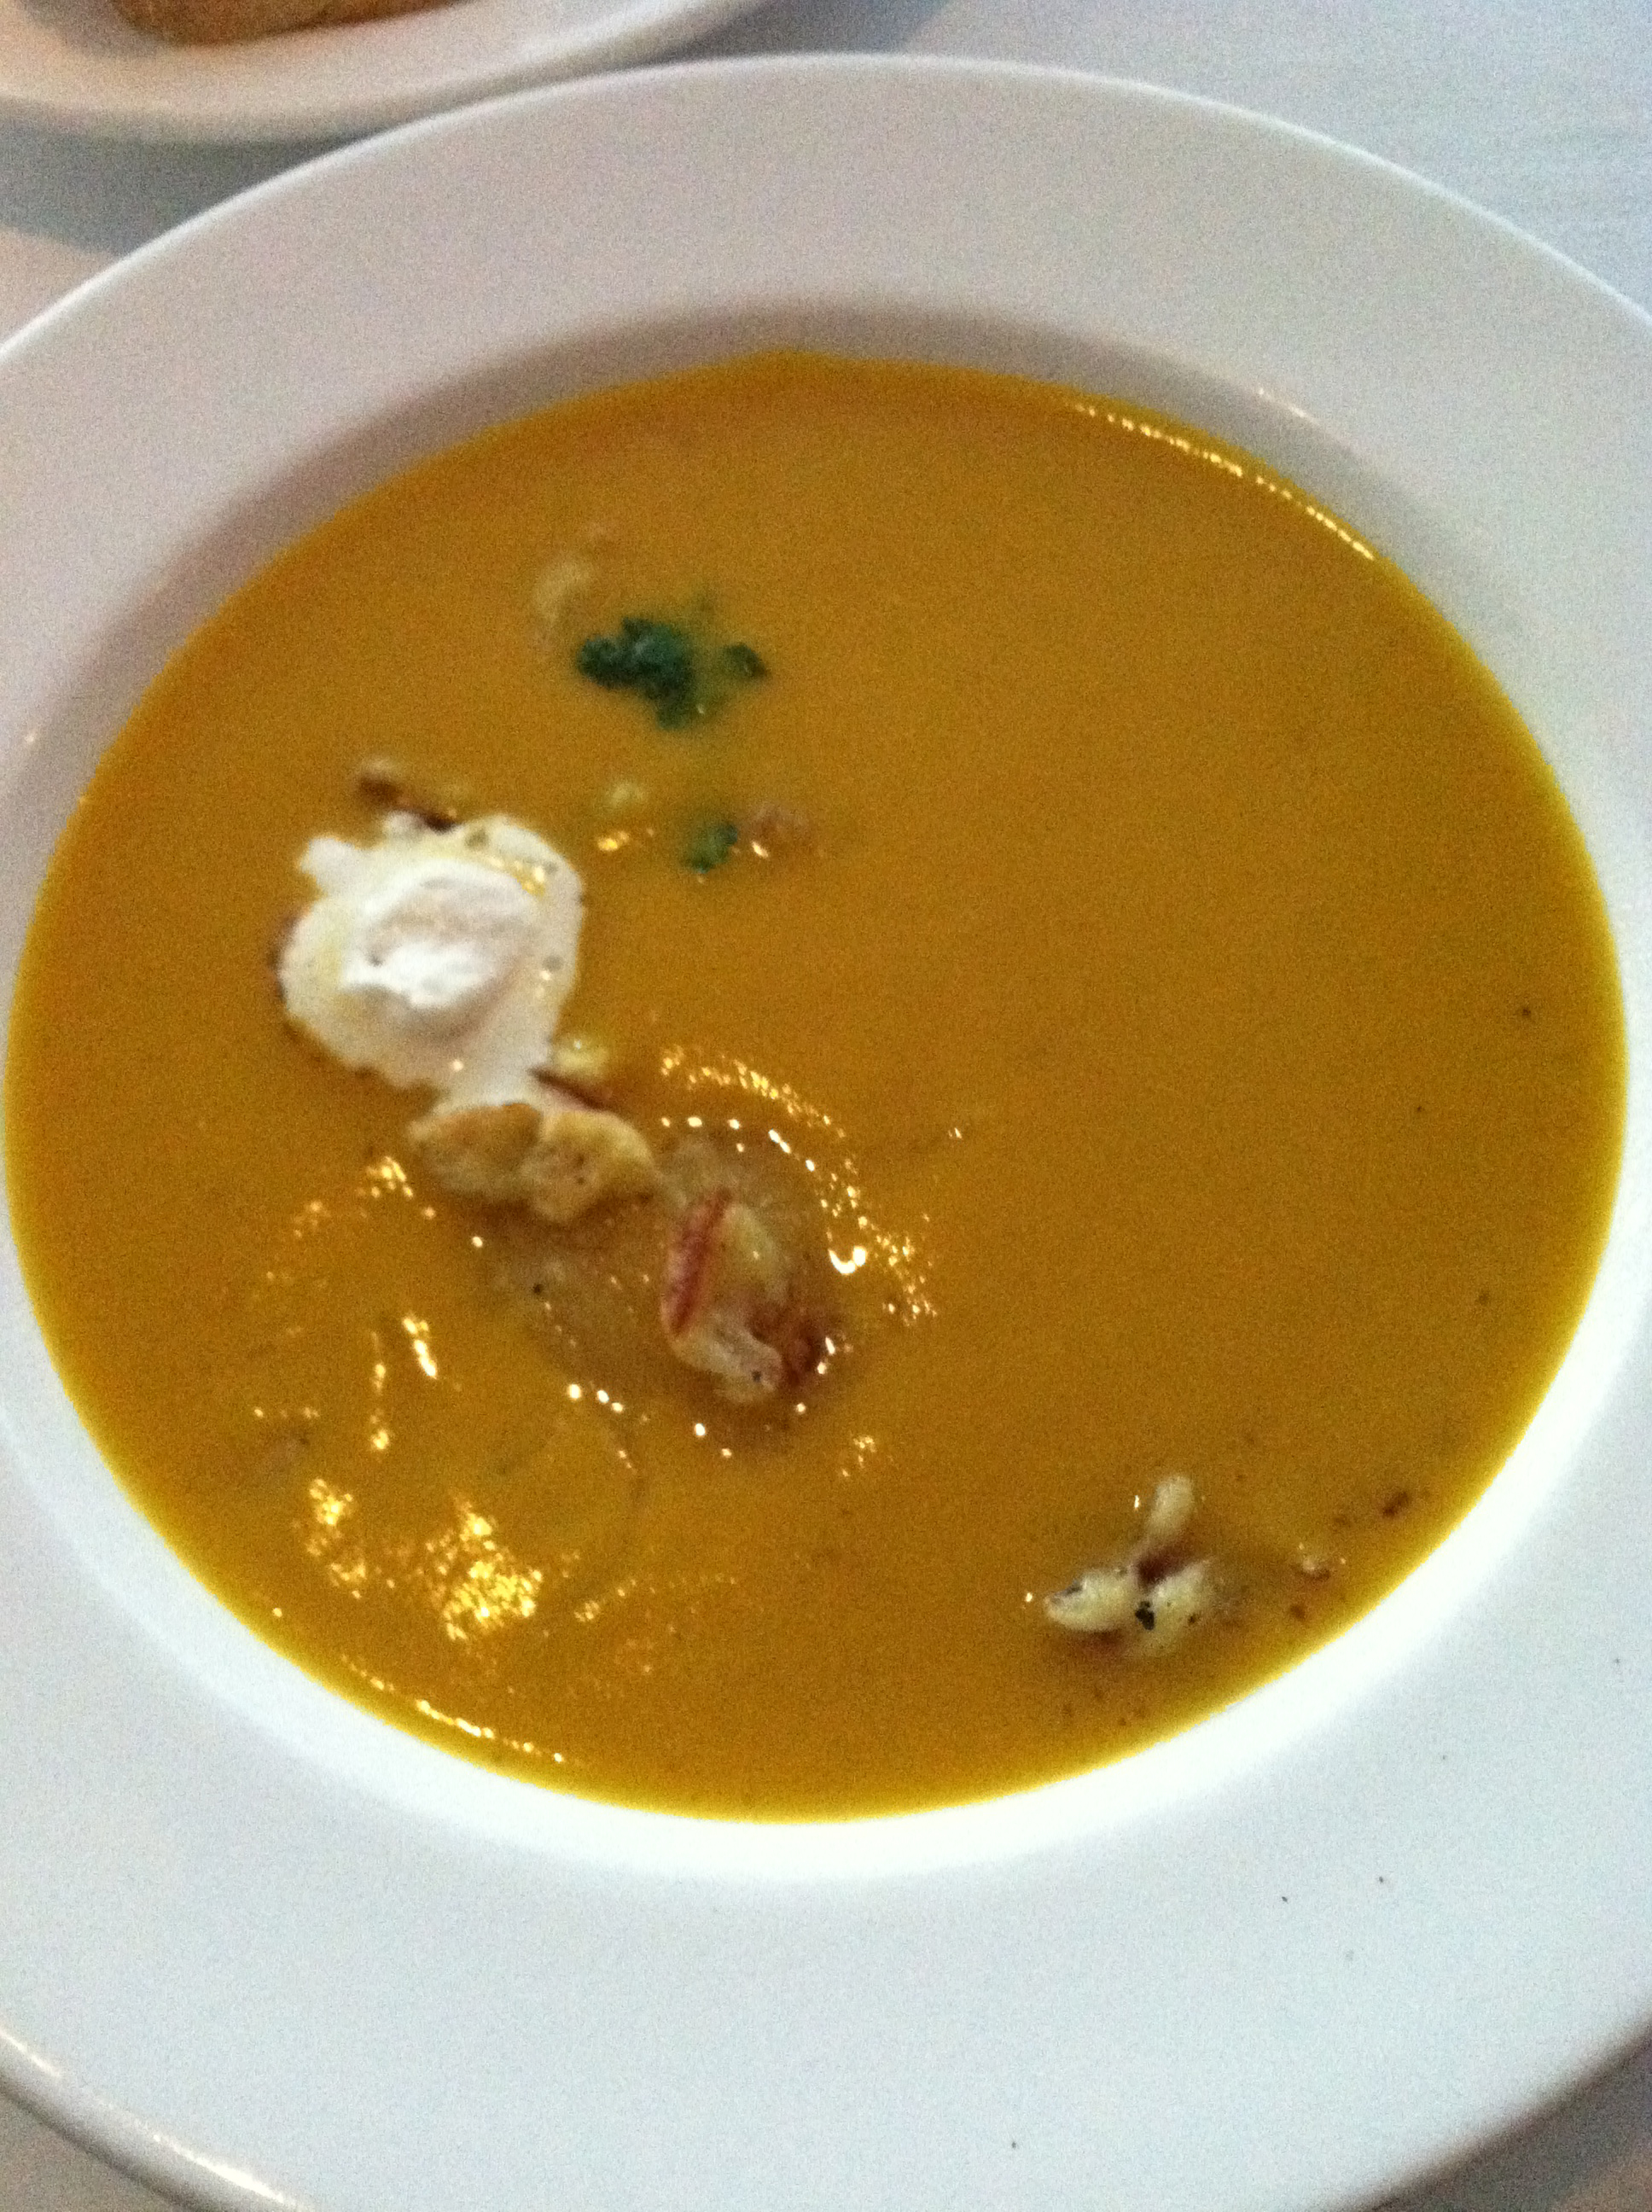
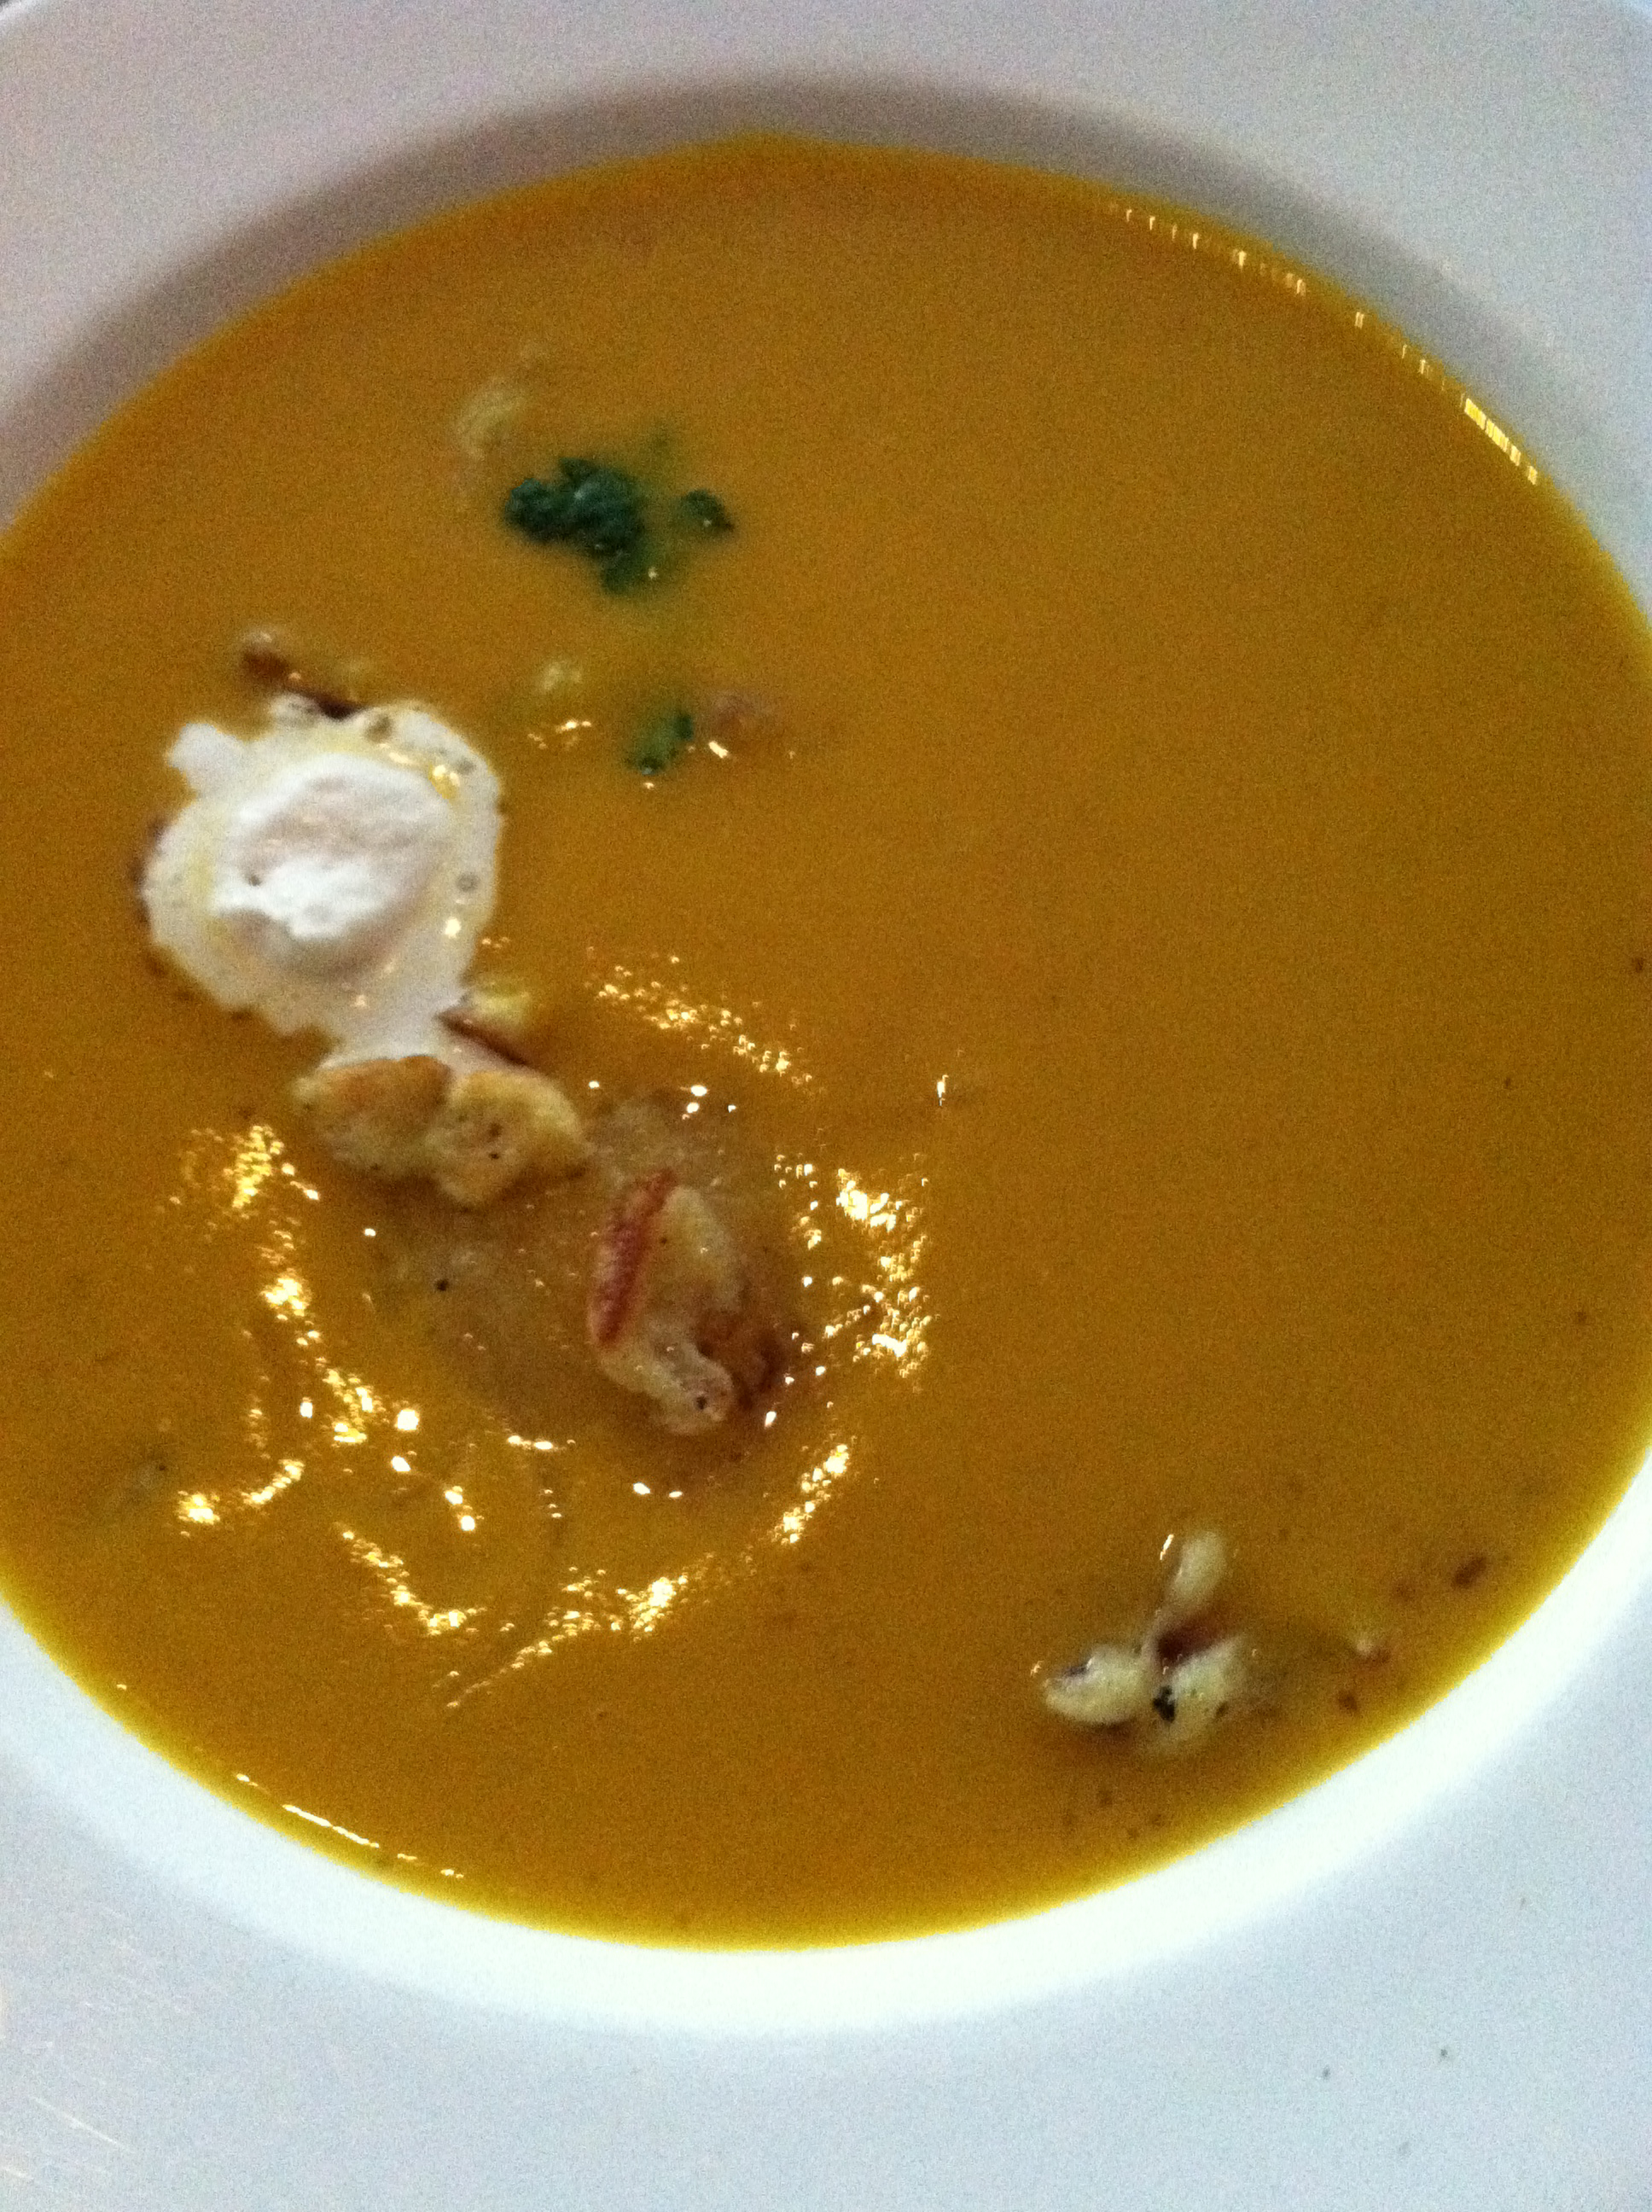
Kaitlyn and I both ordered the Heirloom Marina di Chioggia and Acorn Squash soup to start. When the waiter brought the soup to the table, at first I was a bit confused; he placed the bowls in front of us, which were decorated on the bottom with all the garnishes: herbed spaetzle (crispy, golden-fried pieces of dough with spices), soft strands of spaghetti squash, horseradish cream, and pumpkin seed oil.
Then, using a small glass pitcher, he poured the steaming hot soup into each bowl. He did it the way people would pour tea, holding the pitcher inches above the bowl.

The soup was by far the highlight of the meal; Kaitlyn and I joked that we could have eaten three bowls, and still have been satisfied with our lunch. It was creamy and warm, the perfect antidote to a cold, windy Chicago afternoon. The flavors of the squash were perfectly complimented by the slight kick of horseradish, and the spaetzle seemed to melt in my mouth. I have never had better soup in my life.
For the second course, I ordered skate wing “Milanese” with wheatberries, roasted cauliflower, raisins and cumin, all served atop a delicate Italian frisee salad. I had no idea what skate was prior to lunch, and at first it sounded slightly intimidating; I pictured grilled fish with razor-like edges, staring up at me menacingly from the white china.
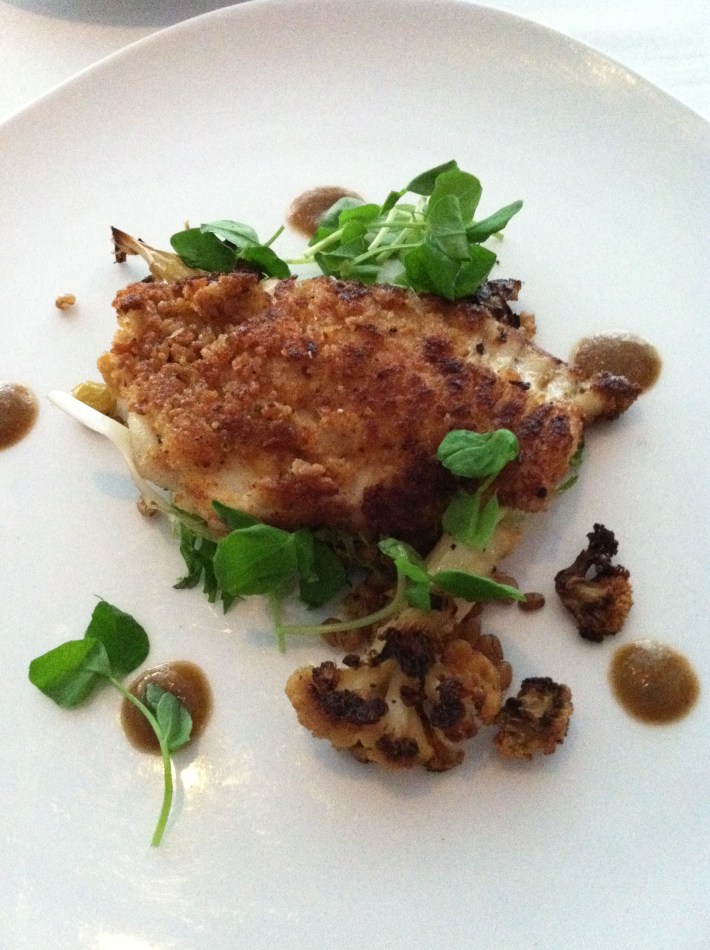
I could not have been more wrong. Skate is a fish, but when cooked “Milanese” style, the outside becomes crispy, brown and lightly-fried, while the inside is soft, buttery, and delicious; when I cut into the fish, it literally collapsed beneath my fork. The fresh taste of the greens paired nicely with the saltier taste of white fish, and the smoked onion vinaigrette added more flavor to the dish.
Surprisingly, neither of us ordered chocolate cremeux for dessert. Maybe it was all the bread we consumed, or maybe because it was hard to choose between the options. In the end, we decided to split an almond “financier” served with brown butter, creme mousseline (rich, mousse-like cream with a hint of vanilla), and fruits soaked in liquor.
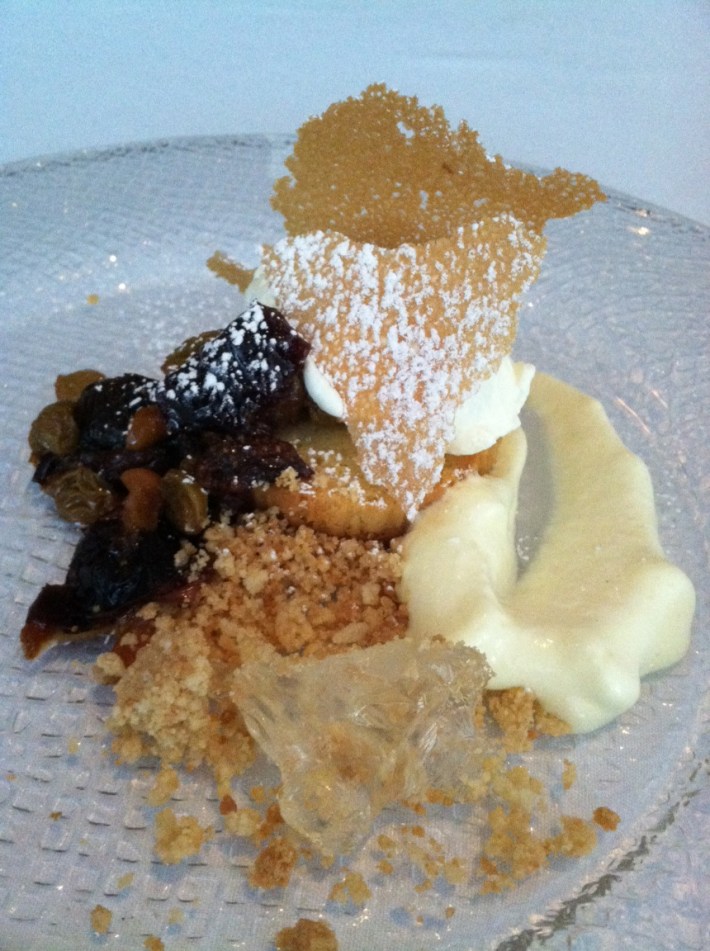
Photo by Kaitlyn
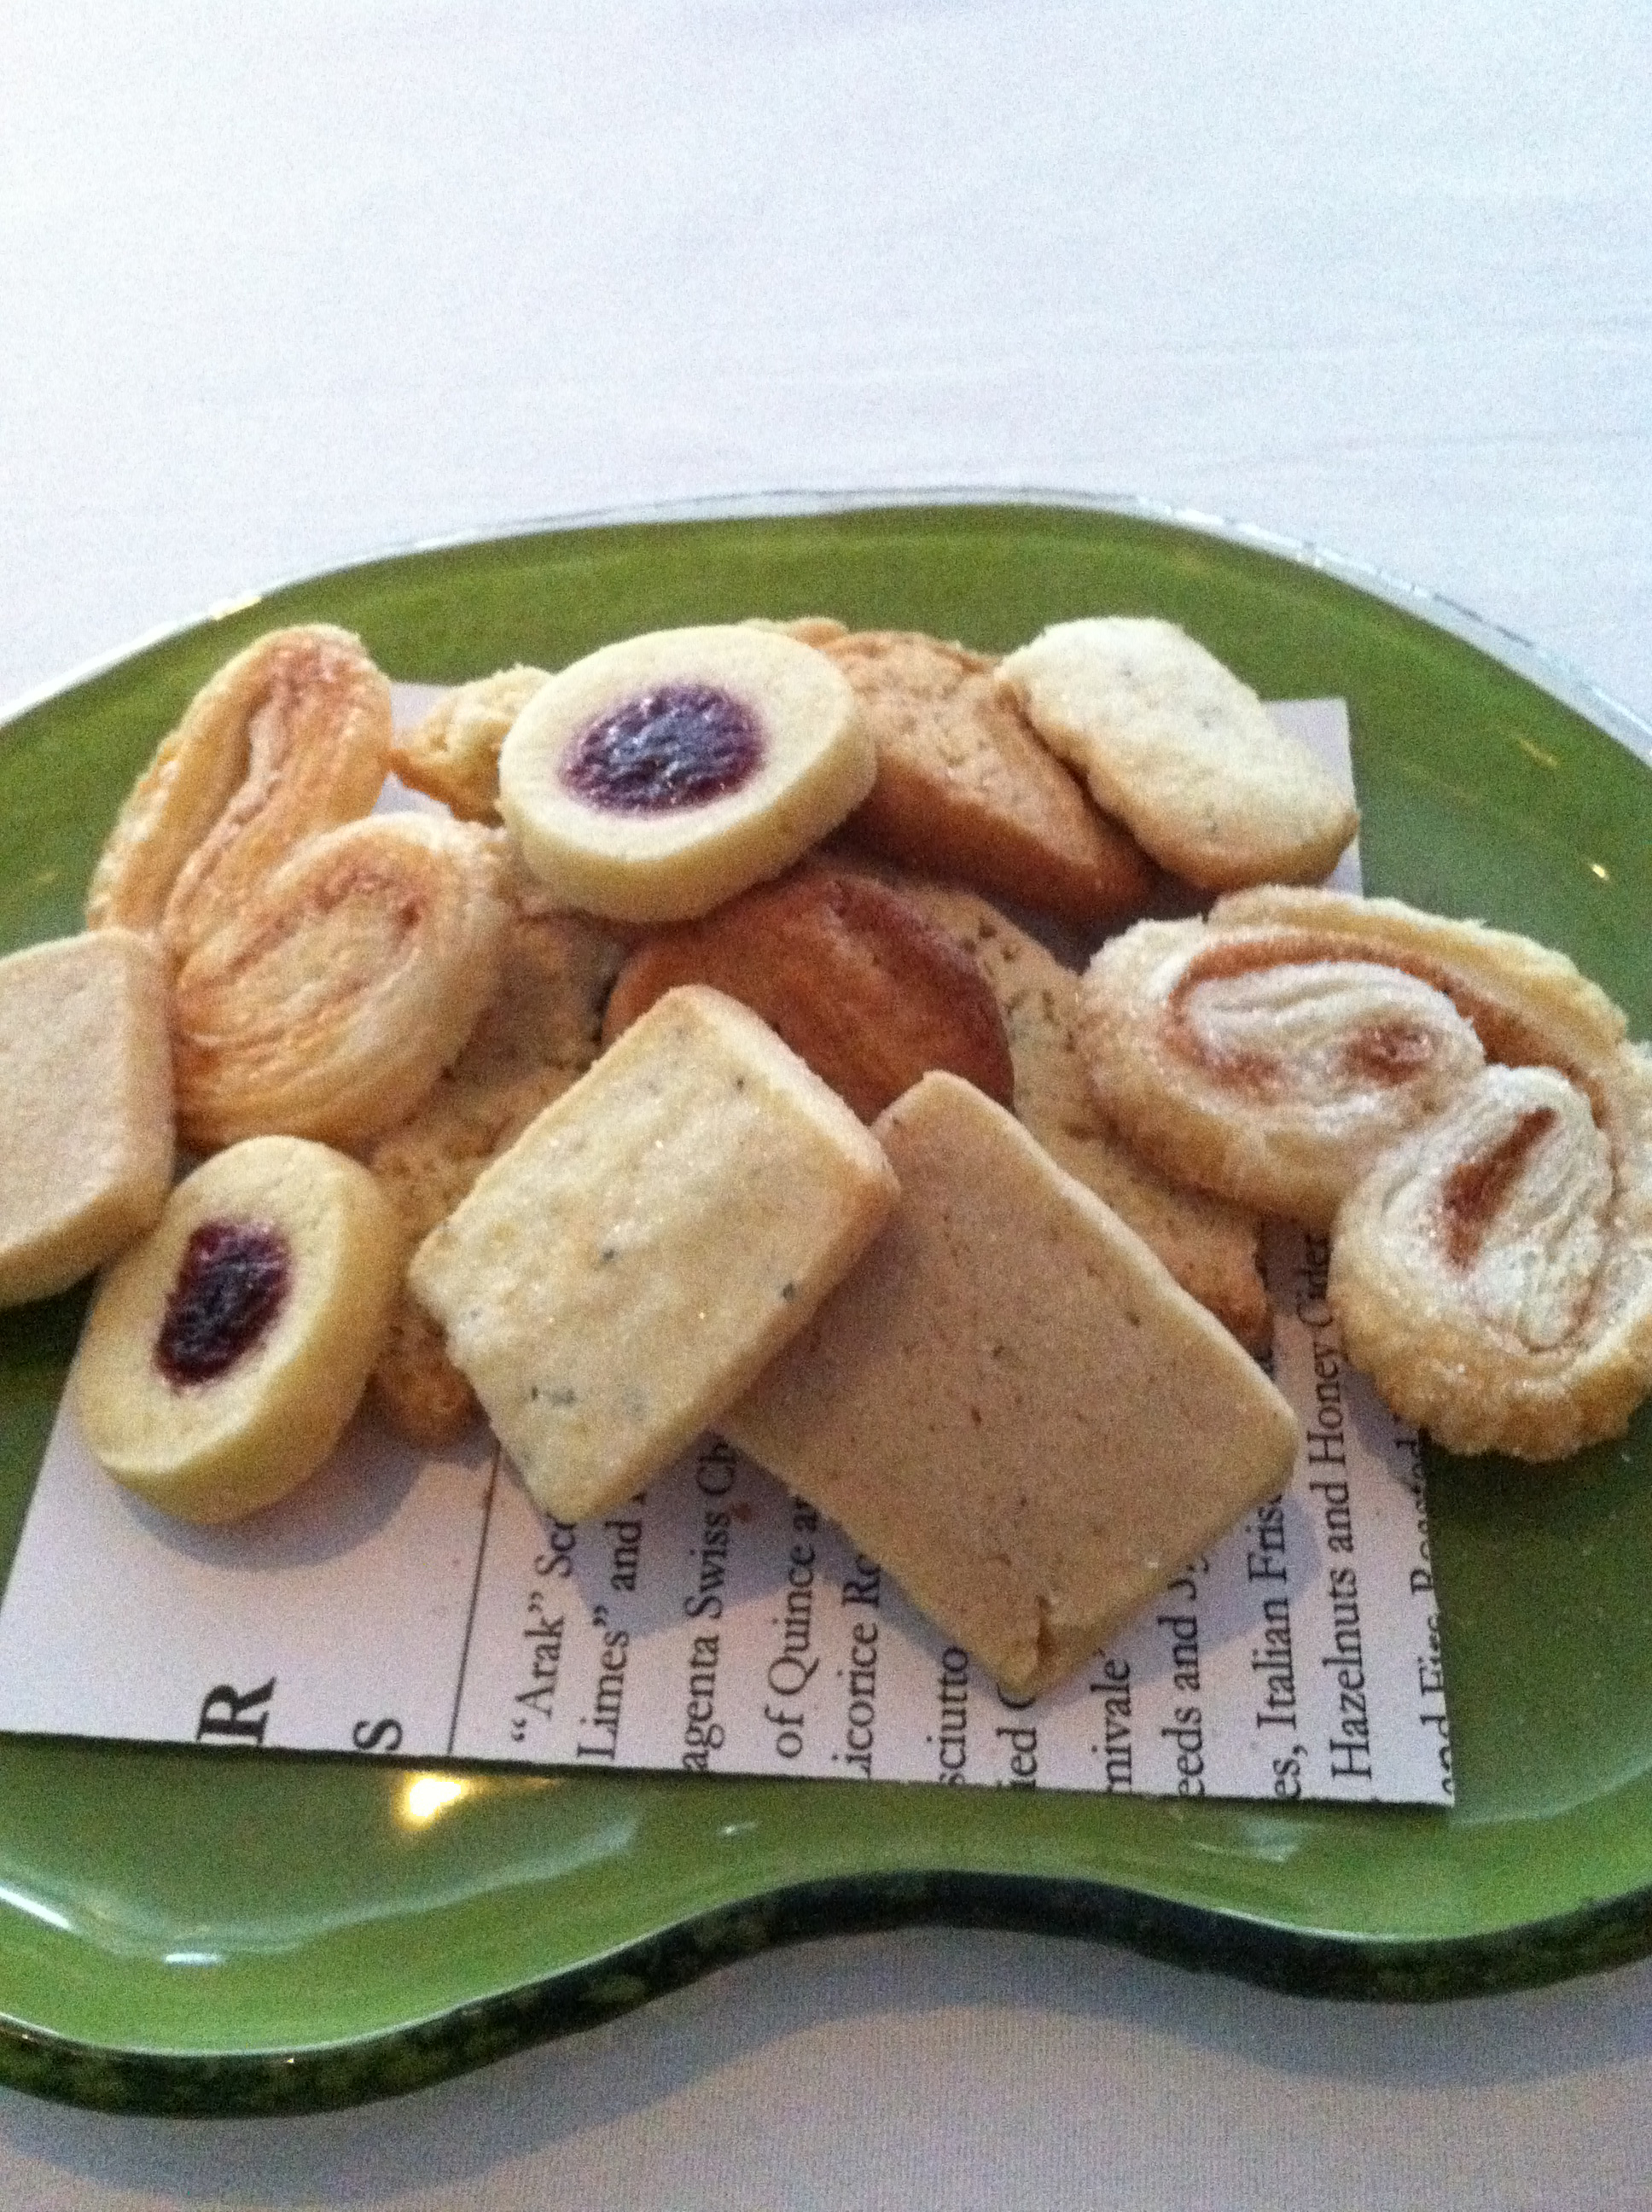
For good measure, we also ordered the “Naha Cookies and Frivolities” plate, so we could get a sampling of everything the dessert menu had to offer.

The financier was served with a dollop of cream on top, but I liked dipping it in the brown butter sauce. The golden raisins were plump and juicy, and I’ve never tasted better liquor-soaked prunes…They were sweet with just a subtle hint of alcohol. I wish I could eat all my fruits that way…
All the cookies were delicious, and we received a wide assortment; everything from shortbread to mini lemon thumbprint cookies with jam in the middle. My favorite were the crunchy peanut butter cookies and the mini palmiers. Palmiers are French pastries that are named after palm leaves (because of their leaf-like shape), but are also referred to as “Elephant Ears.” The dough was buttery and flaky, and sprinkled with just the right amount sugar.
When our server brought the check, she surprised us with mini dark-chocolate truffles and rose-water flavored jelly candy. Even after three courses, I devoured the truffles and candy with the same enthusiasm as I did my soup.
The candy was the perfect end to a delicious meal, one that I’ll be talking about for awhile. I think Kaitlyn and I were both a little sad to leave…After all, as stressed graduate students, how often do we get to sit down for a relaxing three-course meal? Especially in a restaurant where attention to detail and service is the rule, rather than the exception?
However, like any good meal, this one will stay with me for awhile. I’m sure when I’m reheating pasta in the microwave during the busy weeks ahead, I’ll remember the creaminess of the squash soup, the soft napkin in my lap, and the company of a good friend. And that, to me, is almost as good as the meal itself.


 This morning when I woke up, the sky was almost black. I knew there was going to be rain, but I didn’t realize it would be a near monsoon; the rain was coming down so hard, it wasn’t even pattering on the window. It sounded like someone was throwing buckets of water onto the glass.
 I’ll never forget the first time I tried naan. It was the week before my freshman year of college, and my academic adviser took me and her other advisees to an Indian restaurant in St. Louis called Rasoi. I had never actually eaten out at an Indian restaurant, and at the time, the whole experience seemed exotic; here I was, about to start the next four years of my life, surrounded by complete strangers and eating completely different food.
 Earlier this week, I went home to celebrate Passover with my family. For those of you who don’t know, Passover is the Jewish holiday that celebrates the Jews’ exodus from slavery in Egypt. Traditionally, you have a seder, or mini-service, at the dinner table, with everyone reading the story of Passover aloud from a book called the Haggadah. You eat foods that play symbolic roles in the story, and then afterward you are rewarded with a giant (flourless) feast.
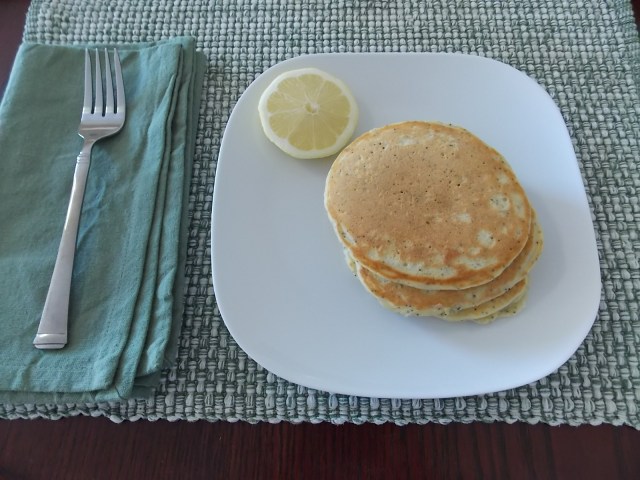 Growing up, pancakes were a breakfast staple item. One of my earliest memories is going to a (now, sadly defunct) restaurant in St. Louis called “Cocoas” for breakfast with my family. I remember my grandpa carrying me over to where the cooks made pancakes on large, counter-sized griddles, and watching them as they ladled large spoonfuls of thick batter onto the piping hot surface. To my five-year-old self, what they were doing was something akin to magic; before my eyes, a large puddle of batter became the cakes that I slathered with butter and maple syrup.


 I topped my pizza with pesto, goat cheese, mushroom and mozzarella; a mix of things in my refrigerator. Because the pizza making process was so much easier than I expected, I’m excited to make another one, soon…I think next time, I’ll try butternut squash and caramelized onions.


