Cranberry Pistachio White Chocolate Cookies

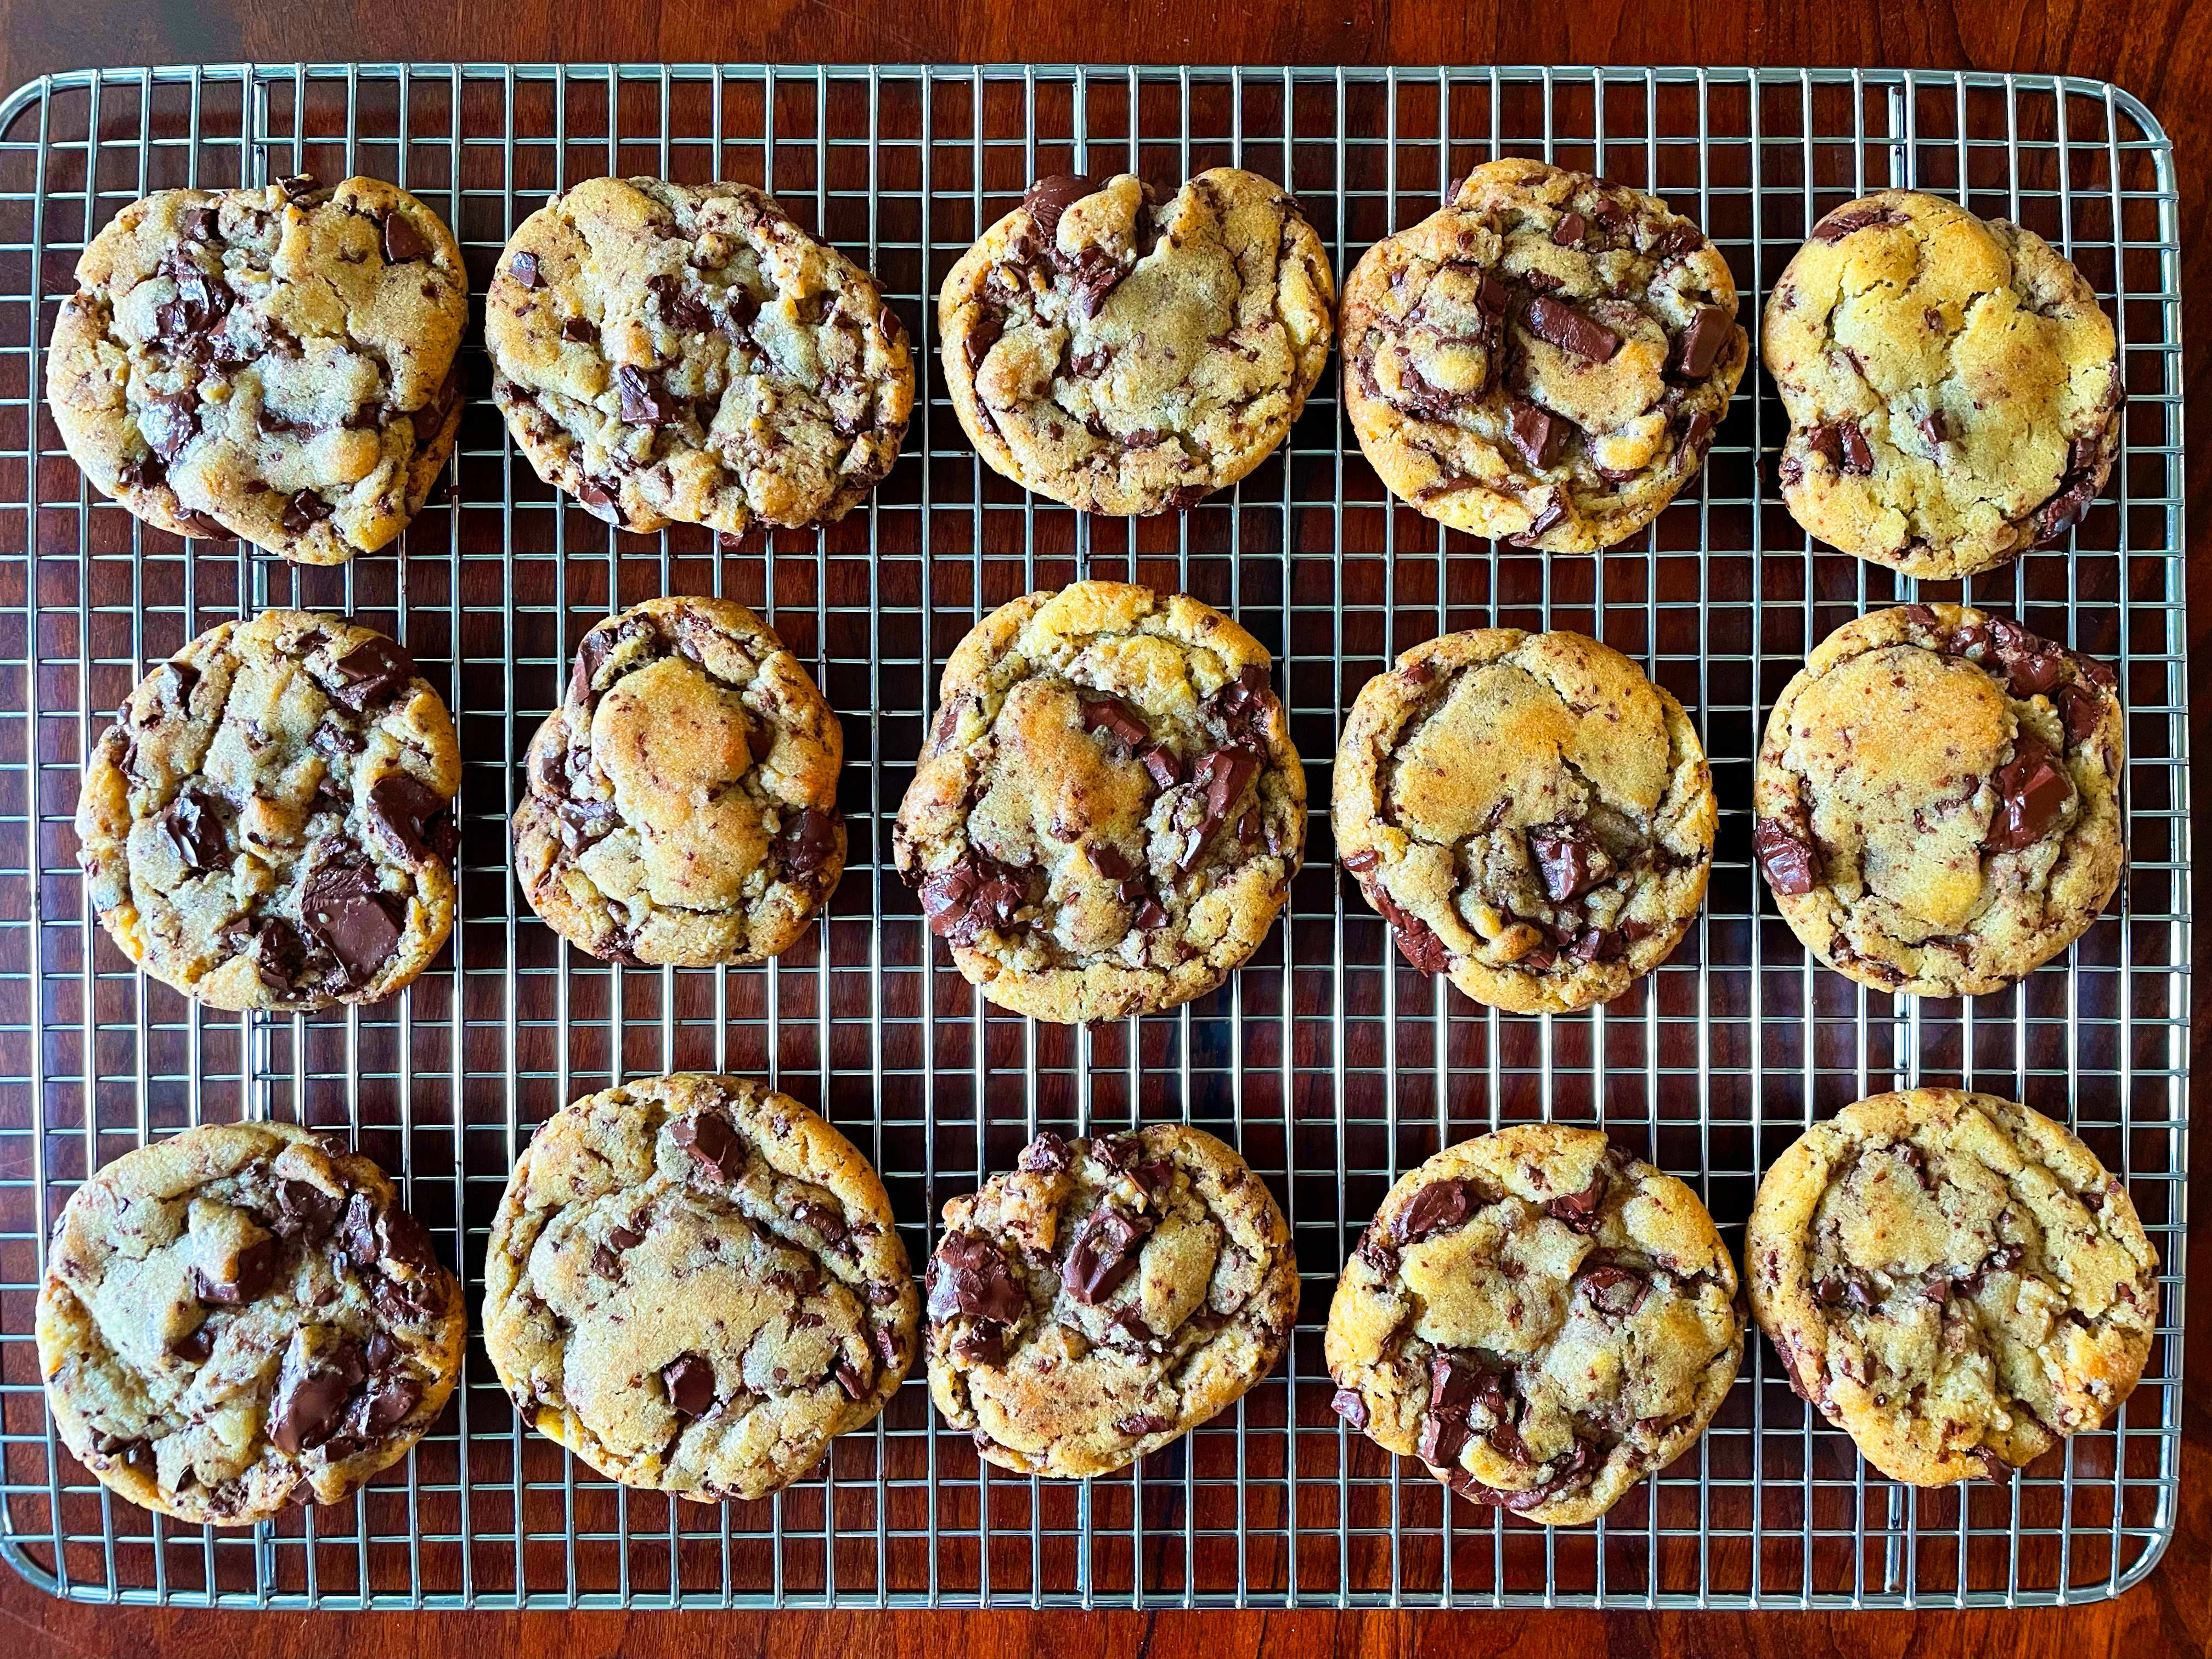
Welcome to this episode of cranberries in everything. Today, I decided to make some cranberry pistachio white chocolate chip cookies.

These cookies are surprisingly good, and I say that not because I thought they’d be disgusting, but because I didn’t trust the ingredient combo or the ingredients themselves. Cranberries are good, but as we know, they’re very tart. I’ve always been kind of “meh” about nuts in cookies, so I was already deviating from the norm there. Then, I decided to add white chocolate chips, which honestly felt like sacrilege. I like white chocolate when it’s melted down, but I think the taste of pure white chocolate is kind of disgusting. It’s like eating a square of butter with some sugar.

So, you might be surprised to know that these cookies turned out to be some of the best I ever made. I hesitate to say, “the best,” because I know that’s not true. I think these cherry chocolate chip oatmeal cookies will always hold first place in my heart. But the ones I made today are soft, slightly chewy, sweet, tart, nutty, and a little fragrant with some cinnamon. I almost cried eating a slightly underbaked one, which is my litmus test for how good anything I bake is.

A few tips for baking these: One, toss the cranberries with a little flour and sugar before you incorporate them into the dough. This will help keep them a little more contained during the baking process, when they get hot, pop, and tend to make the dough a little more runny. Two, use chopped white chocolate, not the chips. You probably think I’m saying that because I just told you I hate pure chunks of white chocolate, but it’s actually more of a textural thing. The chopped white chocolate melts more and creates little pools of melted chocolate, which creates a better bite when you’re eating the cookies.

I’m enjoying these with a big cup of honeybush mint tea. I can’t wait to have some tomorrow when the temperature drops 20 degrees and I want something sweet, warming, and delicious.

Here’s a song to get you started on your cranberry pistachio white chocolate chip cookie journey.

Cranberry Pistachio White Chocolate Chip Cookies

Ingredients

1 cup plus 3 Tbsp (135 g) all-purpose flour
1/2 tsp baking soda
1/4 tsp baking powder
pinch of fine sea salt
pinch of ground cinnamon
6 Tbsp (85 g) unsalted butter, softened but slightly cool
1/2 cup plus 1 Tbsp (115 g) light brown sugar
2 Tbsp (25 g) granulated sugar
1 large egg yolk
1 tsp molasses
1 tsp vanilla extract
1 tsp orange juice (you may need up to 3 tsp now–start with 1, add as needed)
2 tsp fresh orange zest
1/2 cup fresh cranberries, chopped
1/2 cup chopped white chocolate
2 Tbsp chopped pistachios

Directions

First, prep the cranberries. Toss them with 1 tsp granulated sugar and 1 tsp flour in a small bowl. Set aside.

Whisk together the dry ingredients (flour through the ground cinnamon). In the bowl of a stand mixer, cream the sugars and butter at medium speed until light and fluffy, about 3 minutes. Scrape the sides and bottom of the bowl and add the egg yolk, molasses, vanilla extract, orange juice, and orange zest. Beat until combined. Add the dry ingredients and mix on low until just combined. Use a spatula to fold in the white chocolate.

Refrigerate the dough for at least an hour. Preheat the oven to 350 degrees F and line a baking sheet with parchment paper. Remove the dough from the fridge and fold in the cranberries and pistachios. Drop 2-3 Tbsp of dough onto the prepared baking sheet, making sure to leave some space between each dough ball–they will spread.

Bake the cookies for about 9 minutes, or until the middles are slightly underdone but the edges are set. Let the cookies cool for 10 minutes on the sheet. Enjoy!

Posted in Cookies, Dessert | Tagged , , , , , , , , , , , , , , , | Leave a comment

Cranberry Orange Baked Oatmeal

Baking with cranberries is a post-Thanksgiving tradition, mostly because I usually buy a 2/$7 pack and then stare at the pounds of unused cranberries in my fridge. This year, I didn’t buy two packs, but I still had leftover cranberries after making an apple cranberry crisp for dessert. I considered making muffins, as I have done several times in years past, but this morning, I decided to take a different route and make this cranberry orange baked oatmeal.

I’m sooooo happy I pivoted. Don’t get me wrong: Muffins are great, and they’ve served me well in years past. But this year, it snowed the Saturday after Thanksgiving, and I woke up today (Sunday) and craved something warm and comforting, especially before I go outside and brush the snow and ice off my car, which is maybe in my top .003% most hated activities of all time.

This is the kind of dish I love baking because it comes together super quickly, so if you stumble out of bed, make coffee, and attempt to start things half awake, it still turns out okay. Actually, it turns out better than okay, because with minimal effort, you can eat something that tastes like a rustic bed and breakfast in the woods made it for you with cranberries they harvested two days ago. Maybe that’s a stretch, but that’s how it felt to me.

If you’re a fan of super sweet baked oatmeal, you could dial up the sugar in this a little, but I found 1/2 cup of maple syrup to be plenty. You can also add more to the mix like chocolate chips, chopped nuts, or even cacao nibs, if you’re feeling so inclined. I tend to be a purist when it comes to combining fruit in baked goods, but I’m all for getting creative if you want.

I can’t wait to enjoy this for the next few days for breakfast with bottomless cups of coffee. Until then, I’ll leave you with this song, and the recipe.

Cranberry Orange Baked Oatmeal

Ingredients

2 cups old-fashioned rolled oats
1 tsp baking powder
1/2 tsp cinnamon
1/4 tsp salt
1 3/4 cups milk (any kind)
1 large egg
3 Tbsp melted butter or neutral oil (I used avocado oil)
1 tsp vanilla extract
zest of 1 whole orange
1/2 cup maple syrup
1 cup cranberries

Directions

Preheat the oven to 350 degrees F. Lightly grease an 8×8 pan.

Combine the oats, baking powder, cinnamon, and salt in a large bowl. In a separate medium bowl, whisk the milk, egg, oil/butter, vanilla extract, orange zest, and maple syrup. Pour the wet ingredients into the dry ingredients and stir until combined. Fold in the cranberries with a spatula.

Pour the mixture in your prepared baking dish and bake for about 35 minutes, or until the top is set, slightly bounces back to the touch, and is golden brown. Serve with more maple syrup, some yogurt, or just by itself. Enjoy!

Posted in Breakfast | Tagged , , , , , , , , , , , , , , , , , | Leave a comment

Pumpkin Streusel Loaf

This is the time of year where I buy a can of pumpkin every time I walk into the grocery store, whether I want to or not. Call it an addiction; call it an inability to turn down a two for one sale. But somehow, at this juncture, my life is always overflowing with pumpkin. It’s a good problem to have, especially because it encourages me to do things like bake this pumpkin streusel loaf.

This “loaf,” which is honestly more like a cake, came together out of my craving for pumpkin and streusel. I love pumpkin bread in the fall. It’s an orange-red color I can’t resist; the crumb is dense and moist (I hate that word…but there’s no way to avoid it here); and it makes my whole apartment smell better than a pumpkin spice candle. I usually just do a very simple version and throw in some chocolate chips if I’m feeling creative, but today, it was streusel or the highway.

I’m so happy I decided to do it. The streusel adds a little crunch and texture to an otherwise one-note cake. I’m not saying the original is bad, but streusel sets it over the edge. It’s little crumbles of buttery, sugary goodness that melt in your mouth at the same time as the loaf itself. Basically, they’re little flavor sprinkles.

I ate a piece of this with a mug of Earl Grey tea, and I forced myself to wait for the tea to be done brewing before I started eating the cake. As soon as I took my first bite, I completely ignored the tea and devoured the cake. It was just the right amount of sweet, with comforting spice, crunchy pearls of streusel, and a melt-in-your-mouth crumb. I almost started crying eating it, which is a testament to how good it is. Then I dropped a huge piece of streusel on the floor and…I ate it. I wish I could say I was sorry.

Here’s a song and playlist to get you started on your pumpkin streusel loaf journey. The song came on right at the end of my walk today and I thought, “whoa, I haven’t heard this in a while.” Then, when I went to search for it while I was baking, Spotify pulled up all the songs I like with a variant of “talk,” which ended up being one of the best impromptu playlists I’ve ever created. It made me think about many things, including how talk is cheap, and also this song, which reminded me of the time I chased Bad Bad Hats down The Wharf in Washington, DC to get their autograph.

Pumpkin Streusel Cake

Ingredients

for the loaf:
1/2 cup unsalted butter, softened
1 cup dark brown sugar
1 cup canned pumpkin puree
2 large eggs
3 tsp pumpkin pie spice (alternatively, you can use 2 tsp ground cinnamon; 1/2 tsp ground ginger; 1/4 tsp ground nutmeg; 1/4 tsp ground cloves)
1 tsp baking soda
1 tsp baking powder
1 tsp salt
1½ cups all-purpose flour

for the streusel:
6 Tbsp unsalted butter, melted
3/4 cup all-purpose flour
1/2 cup light or dark brown sugar
1/2 tsp pumpkin pie spice

Directions

Preheat your oven to 350 degrees F. Spray a 9-inch loaf pan and line it with parchment paper, and spray the paper. Set it aside.

Beat the softened butter and dark brown sugar on medium speed in the bowl of a stand mixer until it’s completely combined, about a minute. Beat in the pumpkin puree and eggs, beating well after each addition. In a large bowl, whisk together the pumpkin pie spice or individual spices if you’re using those, the baking soda, baking powder, salt, and flour. Pour the dry mixture into the wet mixture and mix until just combined. DO NOT overmix. Spread the mixture into the prepared loaf pan and set aside.

To make the streusel, combine the melted butter, flour, brown sugar, and pumpkin pie spice in a medium bowl. Mix together with a sturdy spoon until everything is completely combined and the mixture looks like wet sand. Drop handfuls of the streusel on top of the mixture in the pan, evenly covering the surface.

Bake the loaf for about 55 minutes, or until a toothpick inserted in the middle comes out clean or with a few wet crumbs. Let it cool completely on a wire rack. Enjoy!

Posted in Breakfast, Cake, Dessert | Tagged , , , , , , , , , , , , , , , , , , , , | Leave a comment

Cardamom Cold Brew

I haven’t made cold brew since the days of COVID social distancing/isolation, when I spent all my money on kitchen tools I used on repeat for a year and then never used again (see: a mint green slow juicer… RIP). This week, I decided to break the drought and try my hand at a new cold brew.

You can make cold brew using tools you already have at home such as a pitcher and fine mesh strainer, but I decided to spring for something different. I got this coffee and tea pitcher off Amazon last month and I don’t regret it. I first used it to make hibiscus iced tea, because I love keeping a pitcher of tea in the fridge during the summer months. Once it cooled down a little, I used it to make a cold brew.

To make this cold brew, I ground up some Onyx coffee beans very coarsely and stuffed them all in the mesh filter. I put about six cups of filtered water in my glass pitcher, threw in 20 cardamon pods, then plunged my filter in. Nothing happened. I panicked a little, because I’m used to seeing coffee or tea automatically diffuse (think of dropping food dye into liquid…it spreads right away), but then I realized it was all part of the process. Cold brew is a marathon, not a sprint.

About thirty minutes into the brewing, I started regretting not adding cinnamon to the mix. So I unscrewed the lid, which is conveniently attached to the filter, so you can easily take it in and out of the pitcher. I threw in 1/4 teaspoon of ground cinnamon and sealed everything up again. By plunging the filter in the water again, it made more coffee spread through the water, which reassured me. I seemed to be on the right track.

Cold brew is supposed to sit on the counter for 12-16 hours (14 is the sweet spot), so I went to bed and said I’d check on it in the morning before work. Things looked pretty good when I went over to see it on my counter. Still, I wondered how good it would actually be. “This is either going to be great or disgusting,” I said to myself.

Spoiler: It was really, really good. So good, in fact, that I couldn’t believe it. It tasted as delicious, if not better, than the canned cold brew I got from a specialty coffee shop in town. It was way better than the cold brew of 2020, which I only have a vague recollection of and caused me to give away my old cold brew pitcher. I impressed myself, which is a great way to start a Monday.

I had some of the cold brew this morning with a splash of 2% milk. It was spicy, slightly sweet, fragrant, and refreshing. I can’t wait to drink the rest of the pitcher this week.

Until then, I’ll leave you with this song and the recipe. I’m adapting it for tools you have at home, but honestly, I’d recommend getting the pitcher if you can. Life is hard enough– make it slightly less complicated with a multi-use pitcher.

Cardamom Cold Brew

Ingredients

1 1/2 cups coffee beans, coarsely ground (I did the 30 setting on my Baratza grinder)
6 cups filtered water
15-20 whole cardamom pods
1/4 tsp ground cinnamon

Directions

Stuff the coffee grounds into the basket of your glass pitcher, or put them into a small bowl. In large pitcher, pour in the filtered water and throw in the cardamom pods and ground cinnamon. If you’re using tools at home, throw your coffee straight into the water mixture and seal the top with a lid or some saran wrap. If you’re using the glass pitcher, plunge in the filter with the coffee grounds and screw the lid on until it’s tight.

Let the mixture sit on your counter for 12-16 hours. I like to put mine there in the late afternoon and check on it the next morning. If you’re using the first method, strain the mixture a couple times through a fine mesh sieve until you have your finished cold brew. If you’re using the glass pitcher, just take out the filter basket, fish out the cardamom pods, which will all be floating near the top, and screw back on the lid. Store in the fridge. Serve over ice, maybe with a splash of milk. Enjoy!

Posted in Drinks | Tagged , , , , , , | Leave a comment

The Best-and Easiest-Tomato Sauce Ever

When July rolls around in St. Louis, it marks the beginning of one of my favorite seasons: Cherry tomato season. I wait for this season literally months out of the year because it also means I can make one of my favorite dishes, spaghetti with homemade tomato sauce.

“Why can’t you make tomato sauce the other 11 months of the year?” you might be asking. It’s a fair question. The only real answer is, I can, but it won’t taste as good as this sauce. When sun gold tomatoes are at their prime, I buy two pints at the farmers’ market. I bring them home, and on Sunday night, I sauté some garlic, add the tomatoes, put a generous handful of salt and some grinds of black pepper in the pot, and then I let it simmer for about 20 minutes. That’s it.

Despite that deceptively simple formula, the recipe yields a sauce that’s fragrant, satisfying, and delicious. Honestly, my apartment smells better than an Italian restaurant right now. I’m not boasting- it’s just a fact.

Since I make this once a week during the summer and early fall, I also bring it into work once a week. This past week, I was sitting at the lunch table with two of my coworkers including my friend Debbi, a self-professed anti-cook who doesn’t make anything. “Can I have the recipe?” she asked. I thought she was joking, but something in her tone made me think she might actually be interested. So, I did what I only do for the top .001% of my associates: I wrote out the recipe by hand. My other coworker took a photo of the two handwritten sheets of paper and started a group text.

I honestly expected the story to end there, but then Debbi texted me later that night and said, “I made the sauce! Jeff said it was good.” I burst out laughing because I literally thought that was the last thing she was going to do. At the same time, I was flattered, because apparently my pasta looked good enough that afternoon for her to want to try it and share it with her husband.

Today, I followed up with her to make sure it was okay if I used her name in this post, and she said Jeff wanted to add that he thought it was a jarred sauce until today. If that isn’t a testimonial for making this sauce, I don’t know what is.

I’m including the recipe below so you can have it for quick meals on Sunday nights, or whenever you’re craving pasta. Feel free to tweak it with different herbs or add-ins. I like a good, simple sauce, but you can get creative with what you mix in.

The only thing I’d advise is to use the best tomatoes you can find. They don’t need to be from the farmers’ market, but look for ones that seem ripe and have a little give. Watery, golf-ball-esque tomatoes are the enemy of this dish. Otherwise, it’s very forgiving.

Here’s a song to get you started on your tomato sauce journey. The music of my youth has been coming back to me in droves lately. I heard this one today and literally stopped in my tracks. All hail King Chingy.

The Best-and Easiest-Tomato Sauce

Ingredients

olive oil
3-4 cloves fresh garlic, minced
2 pints cherry tomatoes (I like sun gold; the orange ones)
salt and black pepper to taste
fresh basil leaves
spaghetti (I like fresh noodles; dried is also great)
freshly grated Parmesan cheese for serving

Directions

Heat a generous glug of olive oil in a large skillet (a wok, even) over medium high heat. When it’s hot but not too hot, add the minced garlic. Fry the garlic for a couple minutes until it’s light brown. Throw in the cherry tomatoes and sprinkle on a generous helping of Kosher salt. Add some black pepper. Mix it all together quickly with a wooden spoon, put the lid on the skillet, and turn down the heat down to low. Simmer the sauce for about 20 minutes, taking off the lid to smush down the tomatoes occasionally with a wooden spoon, or any sturdy spoon you have around. Right before the sauce is done simmering, add some fresh basil leaves and put the lid back on.

Meanwhile, boil your noodles. When they’re done, reserve about 1/2 cup of the pasta cooking water. Drain the noodles. Turn off the heat under the sauce, remove the lid, and add the noodles directly to the skillet with a little reserved cooking water. Mix with two spoons or some tongs. Serve the pasta in shallow bowls with plenty of sauce and some freshly grated Parm (I usually start with a handful). Enjoy!

Posted in Dinner, Uncategorized, Vegetarian | Tagged , , , , , , , , , , , , | Leave a comment

Pastry Check: Skáld Bakery

Welcome to “Pastry Check,” a new semi-regular column on my blog highlighting the best new pastries in St. Louis (and elsewhere…you never know where life might take you).

For the inaugural column, I’m featuring the Strawberry Lemon Danish from Skáld Bakery. Skáld is a new operation in town that is selling its Scandinavian-style wares at the Tower Grove Farmers’ Market on Saturday morning. I’m so glad they exist because they have one pastry that is one of my personal favorites, but is difficult to find in St. Louis: Cardamom buns. I don’t know why I love them so much, but it’s probably because they’re the perfect blend of comfort, sweet, and nostalgia. I’m pretty sure the first one I ever had was from Lost Larson in Chicago, and that one hooked me for life.

I made some a few years ago, and they’re surprisingly easy to make. Yeah, you have to deal with dough rising, but it’s less complicated than say, puff pastry or basically anything that involves laminating (rolling butter into dough many, many times). I remember enjoying some of the cardamom buns I made with a cup of coffee during the winter.

Now that I’ve discovered Skáld, I don’t need to make them anymore. I just need to wake up at 7:30 AM on Saturday morning, drive to Tower Grove Farmers’ Market in the park, and wait in a long line that is totally worth it, because at the end I get a cardamom bun. Today, I also got a strawberry lemon danish, because why wouldn’t I. Strawberries are one of my favorite things, and strawberry lemon is an all-star combo.

I was going to take the danish home and eat it, but as I was walking with two overstuffed shopping bags and a 16 oz cup of hot coffee, I decided to make a pit stop on a park bench. It was a beautiful morning in St. Louis. We’ve had a lot of rain recently, but that finally passed, and the air was crisp and the sky was clear. I chose a more secluded bench, because even though I have no qualms about eating in public, I had a feeling enjoying this danish would be a sacred experience.

I took a bite and I almost burst out crying. It was one of the best pastries I’ve had in a long, long time. The pastry crust was flaky and baked to the perfect consistency, and dusted with crushed freeze-dried strawberries and sugar. The strawberries on top were ripe and fresh. They and the meringue covered a lemon curd that was so good, I almost couldn’t believe it. It struck the perfect balance between sweet and tart.

As I was eating, more people started to pass by on their way to the market. A woman walked by with her dog and the dog lunged toward me. “Sorry!” she said. “She’s very food motivated.” “No problem,” I said. “Me too.” It reminded me of one of my favorite dogs, Sandy, the one I dog sit, because she ran away once and the only way I got her to come back was shaking a box of treats after calling her name where she was holed up on the neighbor’s porch.

ANYWAY. All this is to say, clearly Skáld pastries draw attention, and for good reason: They’re fresh, they’re local, and they bring something new to the table. When I was buying my danish today, one of the owners said, “You’ve come every Saturday, haven’t you?” “I’m a loyal fan,” I said. “Thank you so much,” he responded. “I was going to say something last week.”

I will keep coming back every weekend as long as they’re there. I’m sure another one (or two) of their pastries will make an appearance in a future edition of Pastry Check.

Here’s a song that describes how I feel about this strawberry lemon danish.

Posted in Pastry Check | Tagged , , , , , , , , , , | Leave a comment

Strawberry Cake

A lot of times on social media, or, I guess, in life, people only show you the best version of themselves. I’m not above it. For the most part, I only post things to my accounts that are pretty, delicious, or fun. From what I post, you probably think I have zero mishaps in the kitchen and everything turns out perfectly on the first try.

Well, that’s wrong. The story behind this cake is a long one. It started yesterday morning when I decided to make a strawberry rye buckle, which is basically like a humble coffee cake. I chopped up two pounds of strawberries, lined a cake pan, made the batter, and poured it in the pan. I thought, hmmm, I think I overfilled this pan, but I told myself I didn’t. I really wanted to believe I didn’t.

As it turns out, I did. I kept watching the cake to see if it would overflow into the bottom of the oven, which has happened to me once and is *slightly* traumatic. Thankfully, that didn’t happen. But what did happen was, I sat there for two hours waiting for the middle to set. It was like nails on a chalkboard. I’m already a pretty impatient person, and this felt like something close to torture.

I asked my good friend ChatGPT what to do. It said to turn down the oven temperature a bit and tent the cake with foil. I thought both of those sounded dumb, but desperate times call for desperate measures.

To my surprise, both tips worked. After two painstaking hours, a lower temp and a tent foil helped the middle of my cake set but just barely. I took it out of the oven, and it wasn’t charcoal or even close. The sides smelled a little burned, but overall, it could have been a lot worse. Still, it was so far away from the cake I wanted, I felt demoralized.

I debated what to do. I thought maybe I’d convert it, cut off the bad parts, and glaze or ice it, and pass it off like it was supposed to be that way. Then I thought about giving it to a friend who would eat almost anything. Finally, I opened my trash can and threw it in. I went on a two hour walk to regroup. Yeah, it wasn’t the end of the world, but imagine thinking you would create something beautiful, and then realizing what you made was trash-worthy? It’s not a great feeling.

Luckily, my long walk around the neighborhood calmed me down. I had the presence of mind to set out a stick of butter before I left, because I knew even then I would try again. I decided to use a different recipe and the same size cake pan. I would only fill it 2/3 of the way full. I felt calmer, maybe because I committed to a rebake, or maybe because I knew that no matter what, at least I tried again.

I was rewarded with a golden cake with juicy strawberries that made my whole apartment smell like a strawberry shortcake. I watched it while it baked, so I knew it would turn out okay. I didn’t feel relieved, but I did feel proud of myself for trying again, even when I was in the depths of despair.

I told my friend about it and he said, why didn’t you give me the old cake? Then he said, you’re really a perfectionist, aren’t you? It made me think of a time in grad school when I had flour tortillas and shredded cheese, but I wanted to put more in my quesadilla. I walked a few blocks in the snow to the grocery store and back so I could make exactly the kind of quesadilla I wanted.

“Wow,” my friend said at the time. “You don’t do things half-assed, do you?”

I guess not. I just wouldn’t want to feed myself, or anyone else, something that was slightly inedible. Plus, if I know it can be better, I will make it better. Call me crazy or a perfectionist, but that’s just the way I operate.

Here’s a song to get you started on your strawberry cake journey. Somewhat ironically, it was playing while I accidentally destroyed the first cake. I like the lyric, “When I was driving in Missouri/someone told me a ghost story.”

Strawberry Cake

Ingredients

290 grams all-purpose flour
8 grams baking powder
pinch of Kosher salt
115 grams unsalted butter, room temperature
70 grams granulated sugar
75 grams dark brown sugar
1 tsp vanilla extract
2 large eggs, room temperature
180 grams buttermilk
295 grams strawberries, hulled and cut into rounds
powdered sugar, for dusting

Directions

Spray a 9-inch cake pan and line the bottom and sides with parchment paper. Preheat the oven to 350 degrees F.

Whisk the flour, baking powder, and salt in a large bowl. In the bowl of a stand mixer, beat the butter, sugars, and vanilla extract on medium high until light and fluffy, about five minutes. Scrape down the bottom of the sides and beat in the eggs one at a time. Scrape down everything again, make sure it’s well mixed, then mix in half the flour mixture followed by half the buttermilk. Repeat until you’ve added all the flour and buttermilk.

Use a spatula to gently fold in half the strawberries. Scoop the batter into the prepared pan and spread the top so it’s even. Add the rest of the strawberries and gently press them into the surface.

Bake the cake for about 50 minutes, or until the top springs back to the touch and is golden brown. Let it cool completely in the pan before removed, dusting with powdered sugar, and serving. Enjoy!

Posted in Cake, Dessert | Tagged , , , , , , , , , , , , , , , | Leave a comment

Monster Cookies

The only thing scary about these monster cookies is how good they are.

Monster cookies are a cookie for someone who can’t decide on one kind. Let’s face it: We all have to make too many decisions in life, so why not make something easy? They have peanut butter, M&Ms (mini, in this case), chocolate chips, oats, and lots of sugar. They hearken back to childhood sugar overload, when one cookie was never enough. Actually, I think the same is still true today.

Monster cookies take me way back to childhood. Even though I don’t have a specific memory of eating these or watching my mom make them, I know they happened, the same way I’m confident I ate ice cream every day during the summer, raced around the neighborhood on my bike, or listened to Top 100 on the radio on Saturday mornings. Like these memories, they’ve stayed with me. Today, I decided to make them happen again.

I have my coworker to thank because she requested these after I opened my weekly baking for the office up to requests. When she said monster cookies, it was like a lightbulb went off. “Yes,” I thought. I’d actually wanted to make these for years after seeing other food bloggers post photos of them on Instagram, but for some reason, I never did. I guess everything happens in its own time.

My favorite part about these cookies is how they melt in your mouth. The M&Ms and chocolate chips are a little melted from baking in the oven, and the oats make the cookies very soft. Don’t over bake them because they will firm up on the baking sheets as you let them cool.

I was trying to think of what song to leave you with, and I realized it had to be a 90s song. A fun fact about me as a child in the 90s is that I talked my way into getting a Spice Girls album when I was eight, even though the woman at the store told my parents it was “explicit.” I also had every piece of Spice Girls merchandise ever invented including a sketchpad and pencils.

Monster Cookies

Ingredients

1/2 cup of unsalted butter, softened
100 grams granulated sugar
85 grams dark brown sugar
130 grams creamy peanut butter
1 egg
1 tsp vanilla extract
120 g all-purpose flour
105 g old fashioned rolled oats
pinch of salt
1/2 tsp baking powder
1/2 tsp baking soda
90 g semi-sweet chocolate chips
105 g mini M&Ms

Directions

Preheat the oven to 350 degrees F. Line two baking sheets with parchment paper. Whisk together the flour, oats, baking soda, baking powder, and pinch of salt in a medium bowl. Set aside for later.

Beat the butter and sugars in the bowl of a stand mixer on medium speed until light and creamy, about 2-3 minutes. Add the peanut butter and mix until smooth. Scrape down the sides and bottom of the bowl with a spatula and beat in the egg and vanilla until combined.

Add the flour mixture to the wet ingredients and mix on low until combined. Add the chocolate chips and mini M&Ms and mix until combined.

Use a cookie scoop to scoop the dough into equal sized portions on a baking sheet, spaced a couple inches apart. Bake the cookies for 10-12 minutes until they’re just set and cracking on top. Allow the cookies to cool completely on the sheets. Enjoy!

Posted in Cookies, Dessert | Tagged , , , , , , , , , , , , , , , , , , , | Leave a comment

Thumbprint Cookies

Thumbprint cookies are a sleeper favorite. I say that mostly due to my own preferences, which I’m extending to everyone else who eats cookies (and if you don’t…I don’t think we can be associated). When I reach for a cookie, I want it to have lots and lots of sugar, probably chocolate, and definitely some softness. If it doesn’t have those three things, I probably won’t be satisfied, although truth be told, I’d eat any cookie handed to me.

These cookies only check one of the three boxes, in that they’re soft. The dough actually doesn’t have that much sugar (only 1/2 a cup), and zero chocolate is involved. However, despite missing two of my three gold standards for cookies, they’re incredible. They’re light, fun, vibrant, and delicious. Now that I’m writing about it, they’re basically like having a best friend in cookie form.

There are a few tricks to making these cookies really, really good. One is almond extract. Most at-home bakers have vanilla extract in their pantry, but splurge on some good quality almond extract for these cookies. They add another layer of flavor, especially in dough that is essentially just butter and sugar.

Second, don’t forget lemon zest and orange zest. In a pinch, you can just use one or the other (all lemon or all orange), but try not to omit this. It adds some zest to the cookies and keeps them from tasting too generic.

Finally, *definitely* splurge on some high-quality jam for these. The grocery store brand variety will not cut it. The jam is really the star of the show here, and you can see by its location front and center in the cookies. If you get a subpar kind, the cookies will still be good, but they probably won’t be great. Feel free to choose whichever kind of jam speaks to you. My favorite is raspberry, but I’ve used strawberry and blood orange before, and both are delicious.

I made a batch of these today especially for my coworker’s three-year-old son, who asked her if I made some last week after he tried some in March when I brought them in. I can’t wait to set aside a few just for him. I’m all about giving back to my fans.

In the meantime, I’ll leave you with this song. It’s good to listen to on long walks around your city during springtime or play on repeat in your kitchen when you’re baking cookies.

Thumbprint Cookies

Ingredients

220 g all-purpose flour
85 g almond flour
1/4 tsp salt
225 g unsalted butter, softened
100 g sugar, plus 2 tsp
3 large egg yolks
1 tsp lemon zest
1 tsp orange zest
1 tsp vanilla extract
1/4 tsp almond extract
1 egg white, whisked
75 g high-quality store-bought jam

Directions

Preheat the oven to 350 degrees F. Line two baking sheets with parchment paper.

Whisk the flours and salt together in a medium bowl. In the bowl of a stand mixer fitted with the paddle attachment, cream the butter and 1/2 cup of sugar on medium speed until light and fluffy. Add the egg yolks all at once and mix until combined, scraping the sides and bottom of the bowl as needed. Add the zests and extracts and mix everything together until combined. Add the flour mixture and mix until just combined on low speed. Use a spatula to scrape the sides and bottom again to make sure the dough is uniform.

Use a small cookie scoop to scoop the dough out. Roll into balls and place on the prepared baking sheets, leaving about two inches of space between each dough ball. Use your thumb or the end of a wooden spoon to make an indent in each cookie. Brush with the whisked egg white and sprinkle with the reserved 2 tsp sugar. Fill each hole with 1/2 tsp jam, being careful not to overfill them.

Chill the unbaked cookies for 30 minutes in the fridge. When it’s time to bake, bake one sheet at a time for about 12 minutes, or until the cookies are barely golden brown. Remove from the oven and let the cookies cool completely on the sheets. Store the cookies in an airtight container. Enjoy!

Posted in Cookies, Dessert | Tagged , , , , , , , , , , , , , , , | Leave a comment

The Best Chocolate Chip Cookies Ever…I Promise

If you’ve ever visited my blog before, you know I have a *slight* obsession with chocolate chip cookies. My archived recipes are extensive; the passion is real. A few years ago, I even rounded up a definitive list of best chocolate chip cookie recipes, just to set the record straight.

Well, I spoke too soon because this year, I developed the best chocolate chip cookie recipe in the history of all recipes. “You are exaggerating,” you might be saying, but trust me- I’m not. I’ve now made this recipe three times in the past three months, and every time, it delivers incredible results.

Before I start sounding like a car salesman for chocolate chip cookies, I’ll tell you why this recipe is different. First, it calls for a healthy amount of vanilla extract. Vanilla extract is the secret superpower of chocolate chip cookies. It doesn’t ask a lot, but it gives so much. It is basically responsible for a chocolate chip cookie’s flavor (along with the chips). You might scoff at the idea of adding half a tablespoon of vanilla extract to your dough, but it is worth it. It creates a cookie with a more layered flavor, so you’re not just experiencing the taste of sugar and chocolate.

Second, this recipe calls for a healthy chill time in the fridge. The jury is out on whether or not to chill your chocolate chip cookie dough. Time and patience would dictate you shouldn’t, but my experience as a baker dictates you should. The batch of cookies I made today turned out excellent after I chilled the dough for about 24 hours.

However, the time they turned out the best was actually right after I got sick in February. I was planning to chill the dough overnight and bake the cookies in the morning, but I felt like I was getting sick, so I rolled the dough into balls and froze them in plastic bags to make when I got better. When I was finally better, I defrosted the balls on a parchment paper-lined baking sheet for 30 minutes, baked them for the same amount of time, and they were incredible. I tested my hypothesis at work when I brought a second batch in a week later, and everyone agreed the earlier one from two-week frozen dough was better.

Finally, as is true with so many things in baking, quality chocolate makes a difference. I like to use semi-sweet Guittard, which you can get at Whole Foods or other specialty grocery stores. I’ve had a lot of people tell me they can taste the difference, and it makes me feel better about spending that much money on chocolate. In cookies, as in life, sometimes you have to pay a little more to get the good stuff.

Here are a couple songs to get you started on your chocolate chip cookie journey. Usually I leave you with just one, but this week, I couldn’t choose. The first one describes how I feel when these cookies come out of the oven, and the second came on last night when I was making the dough. It makes me feel like I’m on a cooking show.

The Best Chocolate Chip Cookies Ever…I Promise

Ingredients

168 g unsalted butter
200 g brown sugar
50 g cup granulated sugar
1 egg plus 1 egg yolk, room temperature
1/2 Tbsp pure vanilla extract
220 g all-purpose flour
3/4 tsp baking soda
heaping 1/4 tsp kosher salt
225 g semi-sweet chocolate, chopped

Directions

Melt the butter in a small saucepan over medium heat, swirling it and cooking it until it turns brown. Immediately remove the saucepan from the stove and pour the butter into another bowl to cool.

Whisk the flour, baking soda, and salt together in a large bowl. Set aside. In the bowl of a stand mixer, mix the cooled butter, brown sugar, and granulated sugar together on medium speed until well combined. Add the egg, egg yolk, and vanilla extract, and mix until well combined, scraping down the sides of the bowl and bottom as needed to make sure everything is well incorporated.

Add half the flour mixture to the bowl with the wet ingredients and mix until combined. Then, add the rest of the flour mixture little by little until it’s all combined. Don’t overmix. Use a spatula to incorporate the chopped semi-sweet chocolate.

Chill the dough for at least 24 hours in the fridge. If you want, you can roll the dough into balls, freeze them on a baking sheet, then store them in the freezer in airtight plastic bags until you’re ready to bake them. If you go the latter route, let the balls of dough defrost on the counter for 30 minutes before you bake them.

When you’re ready to bake, preheat your oven to 350 degrees F. Line two baking sheets with parchment paper. Use a 1.5 to 2 Tbsp scoop to portion out the dough into balls, setting them about 2 inches apart on the baking sheets.

Bake one sheet at a time in the oven for 11 minutes until the cookies are puffy but still soft in the middle. Remove them from the oven and let them cool on the sheet for about 5-6 minutes before placing them on wire racks to cool the rest of the way. Store in an airtight container at room temperature. Enjoy!

Posted in Cookies, Dessert | Tagged , , , , , , , , , , , , , , | Leave a comment