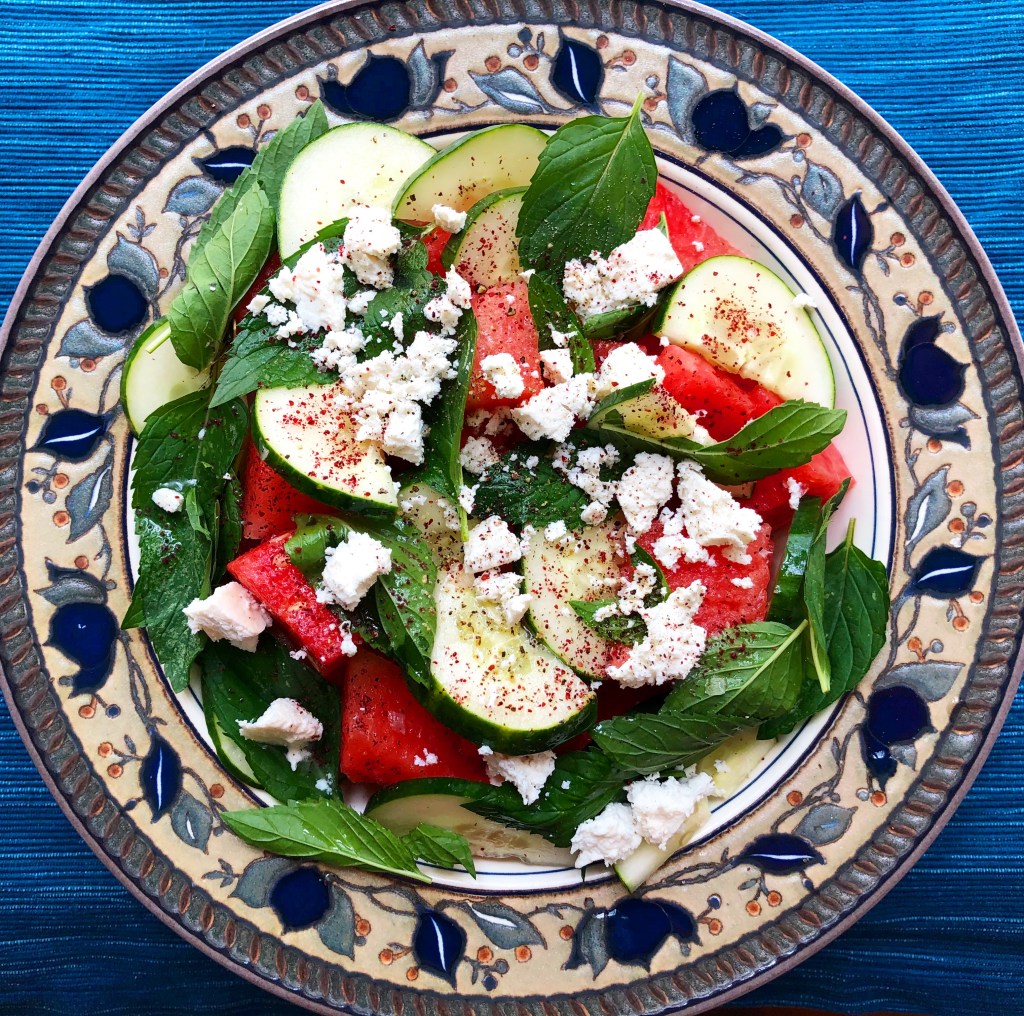
This is the most refreshing summer salad. I will not take any other nominations.
The inspiration for this salad came to me partly due to the abundance of fresh mint in my garden, and partly because it’s so hot in St. Louis. July is known for being hot and humid here, and yesterday was no exception. I went on a walk in the morning and I came back dripping. I didn’t want anything heavy for lunch, so I decided to make this watermelon, cucumber, and mint salad.
As with all things salad, it helps to use the freshest ingredients possible. For this salad, I used some local cucumber from the farmers’ market, mint from my backyard, fresh watermelon, and some really good cheese.
I also sprinkled on some sumac, which I think gives the whole thing a kick. In case you’re not familiar with sumac, it’s a reddish-colored spice used often in Middle Eastern cooking. A friend gave me a bunch of spices as a gift a couple years ago and I’m still using the sumac. It’s great to sprinkle on salads or yogurt dishes.
I think mint really makes this salad, so don’t be tempted to sub it with basil or another herb. However, you could get creative with the fruit you use. I bet cantaloupe would also work well, or even tomatoes.
Here’s a song to get you started on your watermelon salad journey. Have I mentioned how much I like the new Ellie Goulding album?
Watermelon, Cucumber, and Mint Salad
Ingredients
half of one small watermelon, cut up into cubes half of one medium-sized cucumber, sliced and halved 1/2 cup of fresh mint drizzle of avocado oil sprinkle of sumac sprinkle of flaky sea salt crumbled ricotta salata for serving
Directions
Combine all the ingredients through the mint in a large bowl. Drizzle with avocado oil and sprinkle with sumac and flaky sea salt. Finish with crumbled ricotta salata. Enjoy right away.
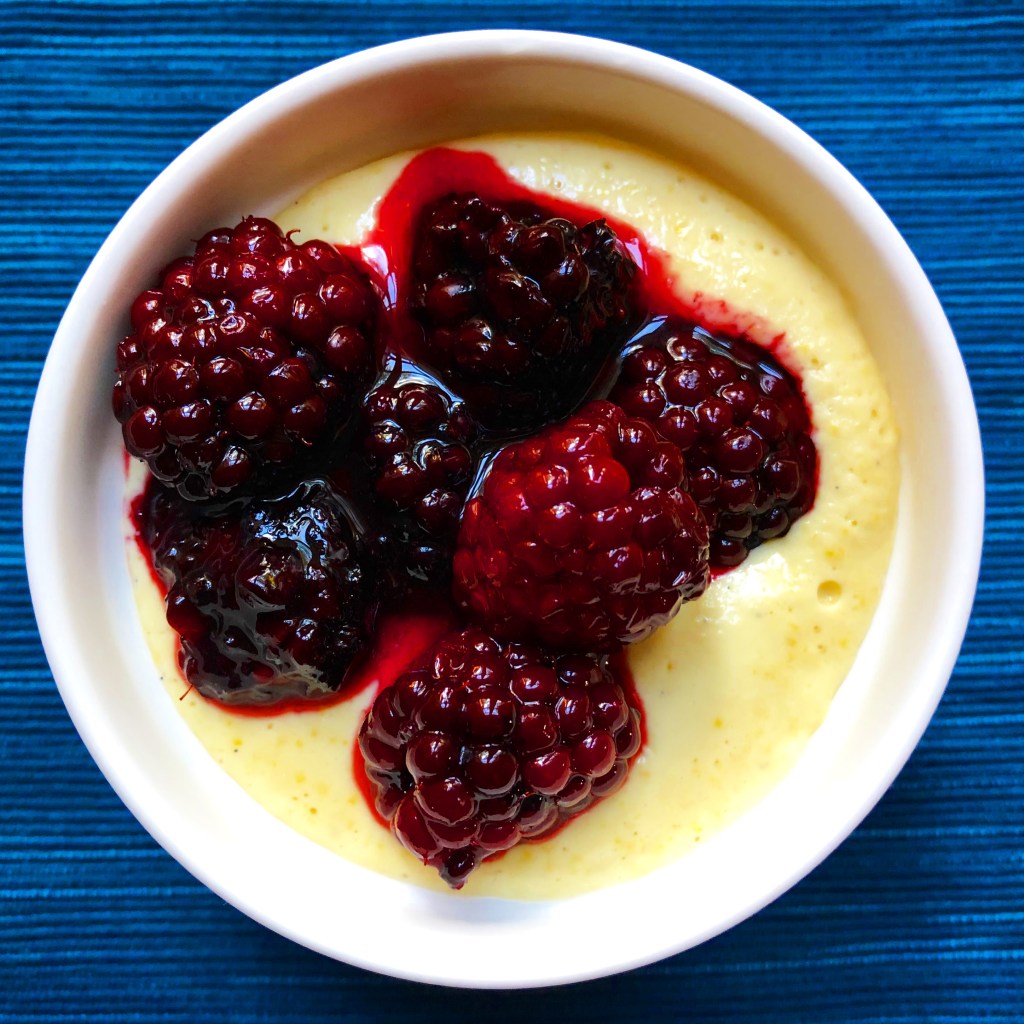
Believe it or not, this is the one of the first times I’ve ever made pudding not from a box. Shocking, I know.
I think it’s because in the grand scheme of desserts, pudding kind of falls by the wayside for me. It’s great when I eat it, but I don’t crave it the way I do chocolate chip cookies or ice cream.
However, the best thing about pudding is that it’s a vehicle for pretty much any flavor. It’s an especially good way to show off summer produce, which I did in this sweet corn vanilla pudding.
We’ve all had, or at least heard of, corn pudding, but usually that’s a side dish at Thanksgiving. This pudding is the sweet variety. It has a good helping of vanilla bean paste, which pairs well with the savory and sweet flavors in the corn, and it has lots of cream and sugar.
There are also small flecks of corn kernels in the pudding. If you’re not a fan of this texture, I would recommend straining the pudding before you put it in the fridge to set. Personally I didn’t mind a few small pieces here and there, but you might want a smoother texture.
I topped the pudding with stewed blackberries but any summer fruit would work well here. I bet blueberries or strawberries would also be super delicious.
Whatever fruit you use, make sure that it’s top quality and nice and juicy. The dish is simple but it gets a boost from fresh, seasonal ingredients. Trust me; you can taste a difference.
Here’s a song to get you started on your sweet corn vanilla pudding journey. It comes recommend from my friend Julicia, whom I trust for most things music.
Sweet Corn Vanilla Pudding with Blackberries
Ingredients
for the pudding: 1 Tbsp cornstarch 3 cups fresh, uncooked yellow corn kernels 2 cups heavy cream 1 tsp vanilla bean paste 1/4 cup honey pinch of kosher salt
for the blackberries: 1 cups fresh blackberries 1/4 cup granulated sugar
Directions
Combine the cornstarch with 1 Tbsp water in a small bowl and set aside. Combine the corn, cream, honey, salt, and vanilla extract in a medium saucepan and bring to a boil over medium heat. Add the cornstarch mixture to the saucepan. Reduce the heat to low and let the mixture simmer for a minute. Remove from heat and allow the mixture to cool to a warm room temperature.
Once the mixture has cooled, transfer it to a blender and puree until the corn is smooth. If you want an even smoother texture with no corn kernels, strain the mixture through a fine mesh strainer. Divide the mixture between six pudding cups, cover them with plastic wrap, and refrigerate for at least six hours or overnight.
Make the blackberry topping well ahead of serving so it has time to cool. Add the blackberries and sugar to a small saucepan over medium heat. Cook them, stirring with a heatproof silicone spatula, until the sugar has dissolved. Remove the saucepan from heat and cool the mixture to room temperature. Put the cooked berries in tupperware and store in the fridge until you’re ready to serve.
Serve the pudding by placing some of the blackberry mixture on top. Enjoy!
Nothing says summer like a good peach pie. I got two pounds of peaches last week in my farmers’ market delivery, and then I realized I was a pound short to make pie, so my boyfriend saved the day and went and got more from the actual grocery store (a place I still do not go because of PTSD associated with zero social distancing at the start of the pandemic and other horror stories that I won’t repeat here).
ANYWAY. The point is that if you have a lot of semi-ripe peaches laying around (and you probably should…it’s summer), this is the pie to make. Notice I said semi-ripe. It’s okay if you use ripe peaches in a pie, but they’re going to be very mushy by the end. If you use semi-ripe peaches, they will still retain some of their original shape and consistency, which improves the pie’s overall consistency. Think about the difference between pureed berries and whole ones. They both have their time and place, but generally speaking, you don’t want to be eating soupy pie.
The real secret to this pie’s success is the crust. Once again, I used the crust recipe from Nicole Rucker’s Dappled cookbook. If you haven’t seen it, I’d highly suggest purchasing a copy, especially if you’re serious about baking. Rucker’s technique involves mixing pie dough by hand, which might scare a lot of people but trust me, it’s crucial. By using your hands, you get to spread the butter more evenly through the dough and create little flaky pockets that show up once you bake the crust. It’s flakier, crunchier, and all around better.
Plus, it’s not that hard. By now I sound like a Dappled acolyte, but maybe that’s because I am. As long as you have a good pastry cutter for when the butter is really cold, you’ll be fine. Trust me; your hands can do more than you think they can.
I’ve included my recipe for the filling below. It has a bunch of spices to compliment the sweet peaches, plus a little vanilla bean paste to seal the deal. It really highlights the fresh fruit, which is the star of this dessert.
Here’s a song to get you started on your peach pie journey.
Peach Pie Filling
Ingredients
3 pounds semi-ripe peaches (yellow are best) 1/2 cup sugar 1 1/2 Tbsp fresh lemon juice 1 tsp vanilla bean paste 1/4 tsp ground nutmeg 1/4 ground cinnamon a pinch of ground cardamom
Directions
Toss the peaches with the rest of the ingredients and let sit for five minutes. Put the filling in your prepared crust, top with another crust, and freeze the whole pie for 15 minutes before baking. Enjoy!
I’ve always wanted to make popsicles at home. The process seemed straightforward: Blend some fruit together, pour it into molds, put a stick in, and let it freeze.
The good news is, that’s exactly what it’s like. Popsicles are one of the easiest and most satisfying, summer desserts to make. They’re a lot less work than ice cream, which involves cooking custard, cooling it down, churning it, and freezing it.
You can get creative with your base. I decided to do watermelon, strawberry, lime because I love summer melon, I had a bunch of frozen strawberries from peak strawberry season in May, and lime adds a little tang. I would highly recommend this combo. It’s sweet, tart, and refreshing.
The hardest part about making these popsicles is waiting for them to freeze. Depending on your freezer, this could take anywhere from a few hours to overnight. I would recommend erring on the side of caution and leaving them in the freezer longer. If you use a silicone popsicle mold like I did, you can also test their doneness by poking the mold and seeing how firm it feels.
I used this silicone mold, and I’d highly recommend it. It’s cool (pun not really intended) because you can fill up each mold and then put a “lid” on top (a top layer of silicone) that prevent the mixture from sloshing over. There are holes in the top layer to put a stick through. Overall this model decreases the potential mess and makes sure your popsicles freeze evenly.
Here’s a song to get you started on your popsicle journey.
Watermelon Strawberry Lime Popsicles
Ingredients
6 heaping cups cubed watermelon 2 heaping cups frozen strawberries juice and zest of one lime
Directions
Blend the ingredients together in a high-power blender until smooth. Pour into popsicle molds, put a stick in, and freeze for at least three hours (but probably more) until completely frozen. Enjoy!
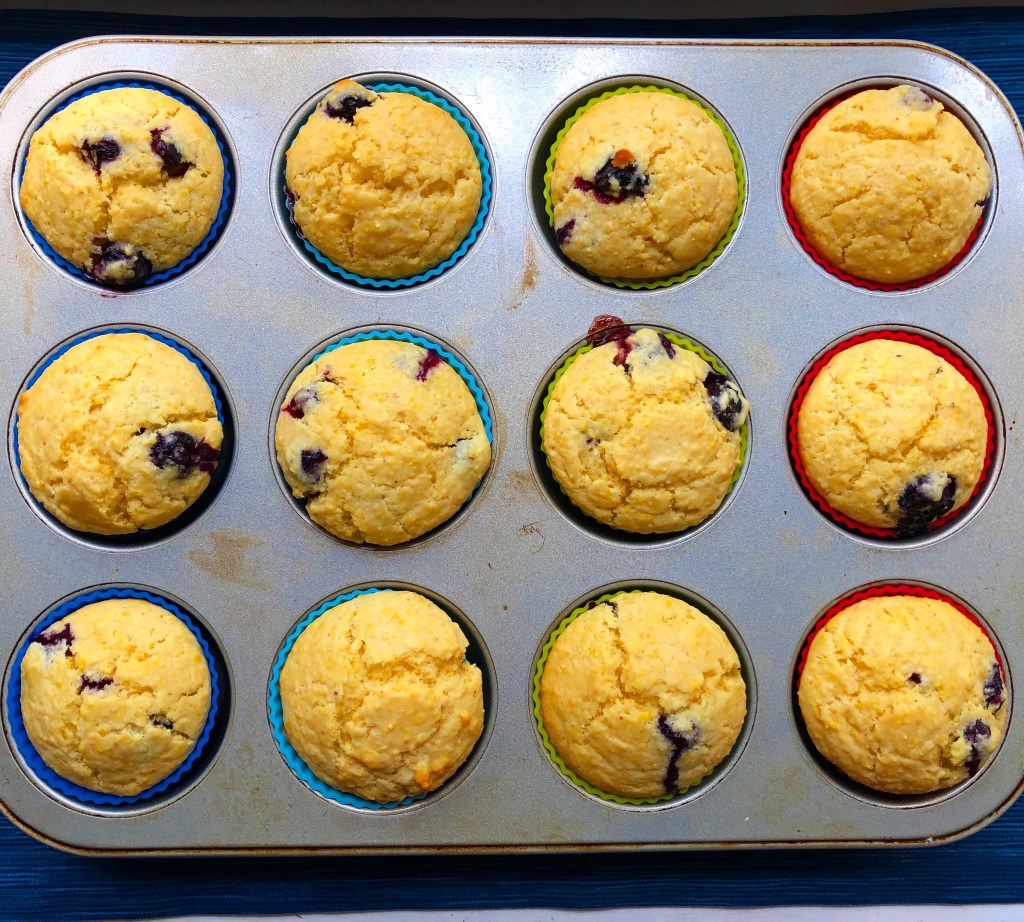
The inspiration for these muffins came partly from the six-pack of Bob’s Red Mill Cornmeal I accidentally ordered online, and the abundance of summer blueberries in the back corner of my fridge.
It’s the time of year when I buy as many fresh farmers’ market blueberries as possible. They’re *so* much better than the Driscolls ones. Don’t even get me started. They’re tart, juicy, and slightly firm, so they explode with flavor when you eat one. They’re nothing like the mushy, almost moldy ones we have to settle for in the winter or early spring months in the Midwest.
I love blueberry and cornmeal together because they compliment each other really well. The cornmeal has an earthy flavor and crunch, and the blueberries are tangy, tart, slightly sweet, and bursting with juice. Heating up blueberries increases the juice factor so when you bite into one of these muffins, the berries explode in your mouth. It’s basically all you could ask for in a muffin, and more.
If you don’t have cornmeal, you could just sub in extra AP flour. But I’d encourage you to explore cornmeal, even if you don’t accidentally order six bags. It lends a flavor and texture that sets these muffins a step above.
You can also play around with fruit. I bet strawberries or blackberries would also work well here. Go for berries that are juicy and fresh, the kind that look like they’re about to pop. The better the berries, the better the resulting muffin.
Here’s a song to get you started on your blueberry cornmeal muffin journey.
Blueberry Cornmeal Muffins
Ingredients
3/4 cup whole milk 1 Tbsp lemon juice 1 1/2 cups all purpose flour 1/2 cup yellow cornmeal 1/3 cup sugar 2 tsp baking powder 1 tsp salt 1 cup fresh blueberries 2 large eggs 1 1/2 tsp vanilla extract Zest of 1 lemon 1 stick unsalted butter, melted
Directions
Preheat the oven to 350 degrees F. Line a muffin tin with paper cups, parchment paper, or silicone baking cups.
Mix the milk and lemon juice and set aside for 10 minutes. In the meantime, whisk together the flour, cornmeal, sugar, baking powder, and salt in a large bowl. Place the blueberries in a small bowl and toss them with a little bit of the flour mixture.
Whisk together the eggs, vanilla extract, and lemon zest in the bowl of a stand mixer. Add the dry ingredients and melted butter. Gently fold in the blueberries in flour until everything is just combined.
Scoop the batter into the prepared muffin tin, filling each cup to the top. Bake for about 30 minutes, or until the muffin tops are golden brown and puffy and spring back to the touch. Let them cool for a few minutes in the tin and then let them cool the rest of the way on a wire rack. Enjoy!
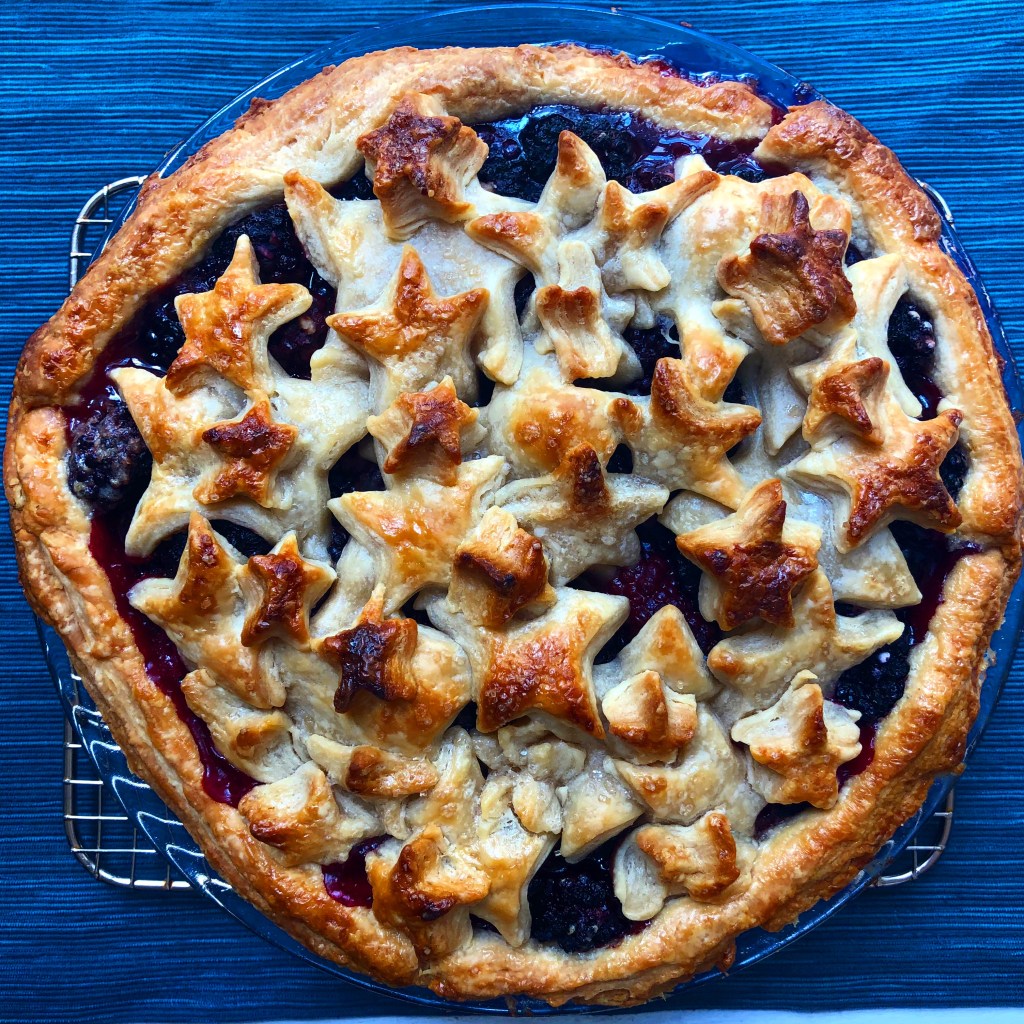
I’ve wanted to make a pie with stars on it for the Fourth of July for years, but I never got around to it, probably because I didn’t want to invest in star shape cookie cutters that I only use once or twice a year.
This year, in the spirit of frivolity, I decided to splurge on the cutters and make a blackberry pie full of stars. It’s one of my favorite baking projects to date. I had so much fun rolling out the crust for the top layer and turning it into different-sized stars. I was a little nervous about how it turn out, but as you can see from the above picture, everything turned out for the best.
This pie was one of the best I’ve ever made thanks to an amazing crust recipe from “Dappled,” a cookbook by Nicole Rucker that is devoted to dessert recipes for fruit lovers. Rucker is all about pie, and in the cookbook she gives a bunch of crust recipes including the one I used for flaky pie crust.
I learned the hard way that it’s basically a blogging faux pas to reprint a recipe from a cookbook, even with attribution. I’m not sure why it’s a no no, but I get it; people who write cookbooks want people to buy the books, instead of doing an easy Google search and landing on the recipe for free.
Before I get carried away talking about copyright issues, I’ll just say that “Dappled” is a great investment and if you’re serious about making pie, you should get it. The crust recipe is all done by hand, which sounds intimidating. Truth be told, I usually make my crust in a food processor because the original recipe I found calls for that. But doing it by hand results in a flakier, more tender crust.
Also, I really like Rucker’s recipe because it calls for vinegar and brown sugar. Both of those ingredients help with the caramelization process and result in a golden brown crust that’s both sweet and savory.
For my blackberry filling, I winged it. I provided a recipe below in case you want to use it, but generally speaking, a little cornstarch, lemon juice, and sugar go a long way when it comes to making blackberry pie filling. Blackberries are tart and sweet, so they need a little balance. They’re also really juicy, which is where the cornstarch comes in. It binds everything together and makes a cohesive filling.
Here’s a song to get you started on your blackberry pie journey.
I’ve been debating whether or not to write something on my blog in response to the murders of George Floyd, Breonna Taylor, and Ahmaud Arbery, not because I don’t have anything to say, but because I’m worried that what I say won’t be good enough or truly get to the heart of the matter. Then I realized that speaking up in favor of justice, even if it’s inadequate, is always better than silence.
The killings of Floyd, Taylor, and Arbery deeply unsettled me. I don’t have many illusions about racism in America. I know it exists, and I’ve seen its destruction. I grew up in St. Louis, a place that has deeply entrenched racial issues dating back hundreds of years and continuing in the present. The killing of Michael Brown in Ferguson in 2014 highlighted the hatred and racism that has festered here for years. I lived in Washington, DC at the time of Brown’s murder, and I remember feeling ashamed that I was from St. Louis. I didn’t want to have any attachments to a place where a Black man is chased and killed.
However, over the years I’ve come to realize that this could happen anywhere in the U.S. St. Louis is known for its race-related crimes, but we’ve seen Black men and women killed across the country. These senseless and brutal murders underscore a deep-seated problem in the U.S., which is bigotry and hatred toward Black men and women.
Protests following the murders of Floyd and Taylor are promising, as they show that people are sick and tired of watching innocent Black men and women killed simply because of the color of their skin. I think we’ve reached a point in history where this behavior is no longer tolerated. Every time you turn on the TV or open a newspaper, you’re confronted with images of protestors, memories and portraits of Floyd, Taylor, and Arbery, and heart wrenching testimonies from family and friends. I’m happy that people are speaking out. We as a society need to be woken up to the realities of the situation and hear about the impact of these killings.
Last Friday, I called my friend Julicia, who runs a great lifestyle blog called The Ainsley Life, for our weekly lunch date. When I got on FaceTime with her, she looked exhausted. “How are you?” I asked. “Not good,” she said. She told me that she was deeply shaken by the murders of Floyd, Taylor, and Arbery. She couldn’t cope with the situation like she usually would by going to walk through local gardens because people always stare at a Black person wearing a mask. Julicia also told me that she was scared to take walks around her neighborhood because Arbery was killed while running through his neighborhood.
Hearing this shook me to my core. As a white woman, I rarely worry about going out in public wearing a mask or taking a walk through my neighborhood. I worry about my safety as a woman, but I don’t have the additional burden of worrying about being attacked because of my skin color. We should not live in a society where this is a concern for anyone.
However, we do live in this society. The first step is acknowledging this difficult truth, and the second step is taking responsibility for it. The third step is educating ourselves so that we can take the fourth and final step — enacting real change. If you think about it, many of us were probably never educated about the realities of race in America in school. I know I wasn’t. I learned just enough to have a basic understanding of Civil Rights and racism, but I didn’t learn about white privilege, brutal killings, hate crimes, and other concepts that rarely make it into history textbooks or classroom discussions. If we haven’t learned about it before, it’s up to us to educate ourselves.
I did research. I told Julicia that I’d already ordered some books to educate myself including “How To Be An Antiracist” and “Stamped from the Beginning” by Ibram X. Kendi. After buying these books, I asked her if there was anything else I could do. Julicia asked if I would be willing to do a workbook and recommended “Me and White Supremacy: Combat Racism, Change the World, and Become a Good Ancestor” by Layla Saad. I said of course. “Thank you. That means so much to me,” she said. “You don’t have to thank me. This is what everyone should be doing,” I said.
It’s important for white people to do their research and take action first before asking Black friends what they can do. Black friends and coworkers can be one resource, but they can’t be the only resource. Black people are already tired and drained. If a white person does zero research and then comes to their Black coworker or friend and asks “What can I do? What resources are out there? Where should I donate?” – they are putting the entire burden of eradicating racism on their Black friends’ shoulders.
Whether you realize it or not, you need to educate yourself. I’ve seen a lot of messages on social media from white influencers about how doing the work to educate yourself about becoming antiracist makes you depressed, uncomfortable, and exhausted. But put yourself in the shoes of people who have suffered and will suffer from racism for the rest of their life. I did. My suffering is minimal compared to theirs. It’s a privilege getting to learn about racism versus having to experience it firsthand. I should be depressed and uncomfortable to live in a society where racism exists. Everyone needs to move out of their comfort zone. That’s the only way we’ll enact real change.
There are so many ways to help. You can patronize Black-owned businesses in your community. You can have difficult conversations with friends. You can participate in protests. You can respond creatively, because creativity is a powerful tool. You can donate to different causes including Unicorn Riot, a nonprofit news organization that covers social and environmental issues, and the NAACP’s Legal Defense and Educational Fund.
You can also watch movies to learn more about racism in America. I recently watched “Just Mercy,” which is free on Amazon right now. It tells the story of Walter McMillian, a Black man wrongly accused of murder in Alabama, and Bryan Stevenson, a Harvard educated Black lawyer who fights to exonerate him from death row. At one point, McMillian tells Stevenson that he doesn’t understand what it’s like to be born guilty. The words stuck with me.
Change will likely happen slowly, and real progress takes time, but we should not sit back and watch it idly. We need to participate, first by listening and then educating ourselves. We should always speak up for what is right. I made a vow to myself to consciously move beyond my privileged perspective and keep my eyes and ears open for injustice. When I see it (not if I see it), I will speak out. I hope you do the same.
I love Middle Eastern food. I think I always have, but my experiences traveling and living abroad increased my appreciation of it. In the town I lived in in France, there was a Middle Eastern bakery and tea shop that had the most exquisite pastries and delicious cups of traditional mint tea. I would stop by often, especially nights when I went to the bar across the street. There’s nothing better than starting (or finishing) a night out with pastries.
Then, I traveled to Israel for the first time eight years ago and I got to try more dishes. I couldn’t believe that people actually ate hummus and vegetables for breakfast. I learned how to appreciate savory dishes more at any time of day, not just at lunch or dinner.
I also had my first Halloumi salad. I couldn’t decide what to order in Jerusalem at lunch one day, and so I copied what an Israeli scout chaperoning our trip ordered. She got a halloumi salad that was light and filling at the same time, full of fresh lemon juice and lots of greens and herbs.
Over the years, I kept making Halloumi salads but I’d add ingredients based on what was available or depending on my mood. Last night, I decided to make a Halloumi, date, and orange salad. I got the inspiration from “Zaitoun,” a cookbook by Yasmin Khan that features Palestinian cuisine. I just bought it and I want to make everything.
Khan features an appetizer-like dish with Halloumi, pomegranate seeds, dates, and oranges. Unfortunately I can’t find good pomegranates in St. Louis this time of year, so I decided to nix the pomegranate seeds and add pistachios instead. I also added fresh farmers’ market lettuce as a base and avocado. I kept the dates, because I can find those at specialty stores pretty much year-round.
If you don’t have a grill pan, you can use a regular frying pan for the Halloumi. Just make sure you watch the heat because frying cheese in hot oil can get precarious at times.
This salad is the perfect blend of flavors and textures. It’s crunchy with pistachios, salty with grilled Halloumi, sweet with dates, tangy with oranges, and it also gets a kick from the pomegranate molasses dressing. Now that I’m writing about it, I want to make it again.
Until then, I’ll leave you with this song and the recipe.
Halloumi, Date, and Orange Salad
Ingredients
2 small oranges, peeled and sliced into segments with no skin 2 handfuls of quality lettuce 1 small avocado 8 oz Halloumi, sliced olive oil for pan plus 2 Tbsp for the dressing 1/2 cup pitted dates, sliced thin 1/4 cup pistachios, chopped handful of fresh mint leaves, finely chopped 1 Tbsp pomegranate molasses for dressing flaky sea salt for garnish
Directions
To make the salad, first peel your orange, cut it at the top and bottom, and use your knife to slice off the skin. Then split the interior into segments, so you’re left with little pieces of orange. Prepare the avocado by cutting it in half, removing the seeds, scooping out the inside with a spoon, and chopping it or slicing it (your choice).
Heat olive oil in a grill pan over medium heat. Add the slices of Halloumi and grill them for about 5-8 minutes, or until one side is evenly browned. Once one side is evenly browned, flip it to the other side and cook until it’s the same color. Remove all the Halloumi from the pan.
To assemble the salad, place lettuce on plates and top with avocado, oranges, Halloumi, dates, pistachios, and mint leaves. Whisk pomegranate molasses and olive oil and pour the dressing over the salad. Garnish with flaky sea salt. Enjoy!
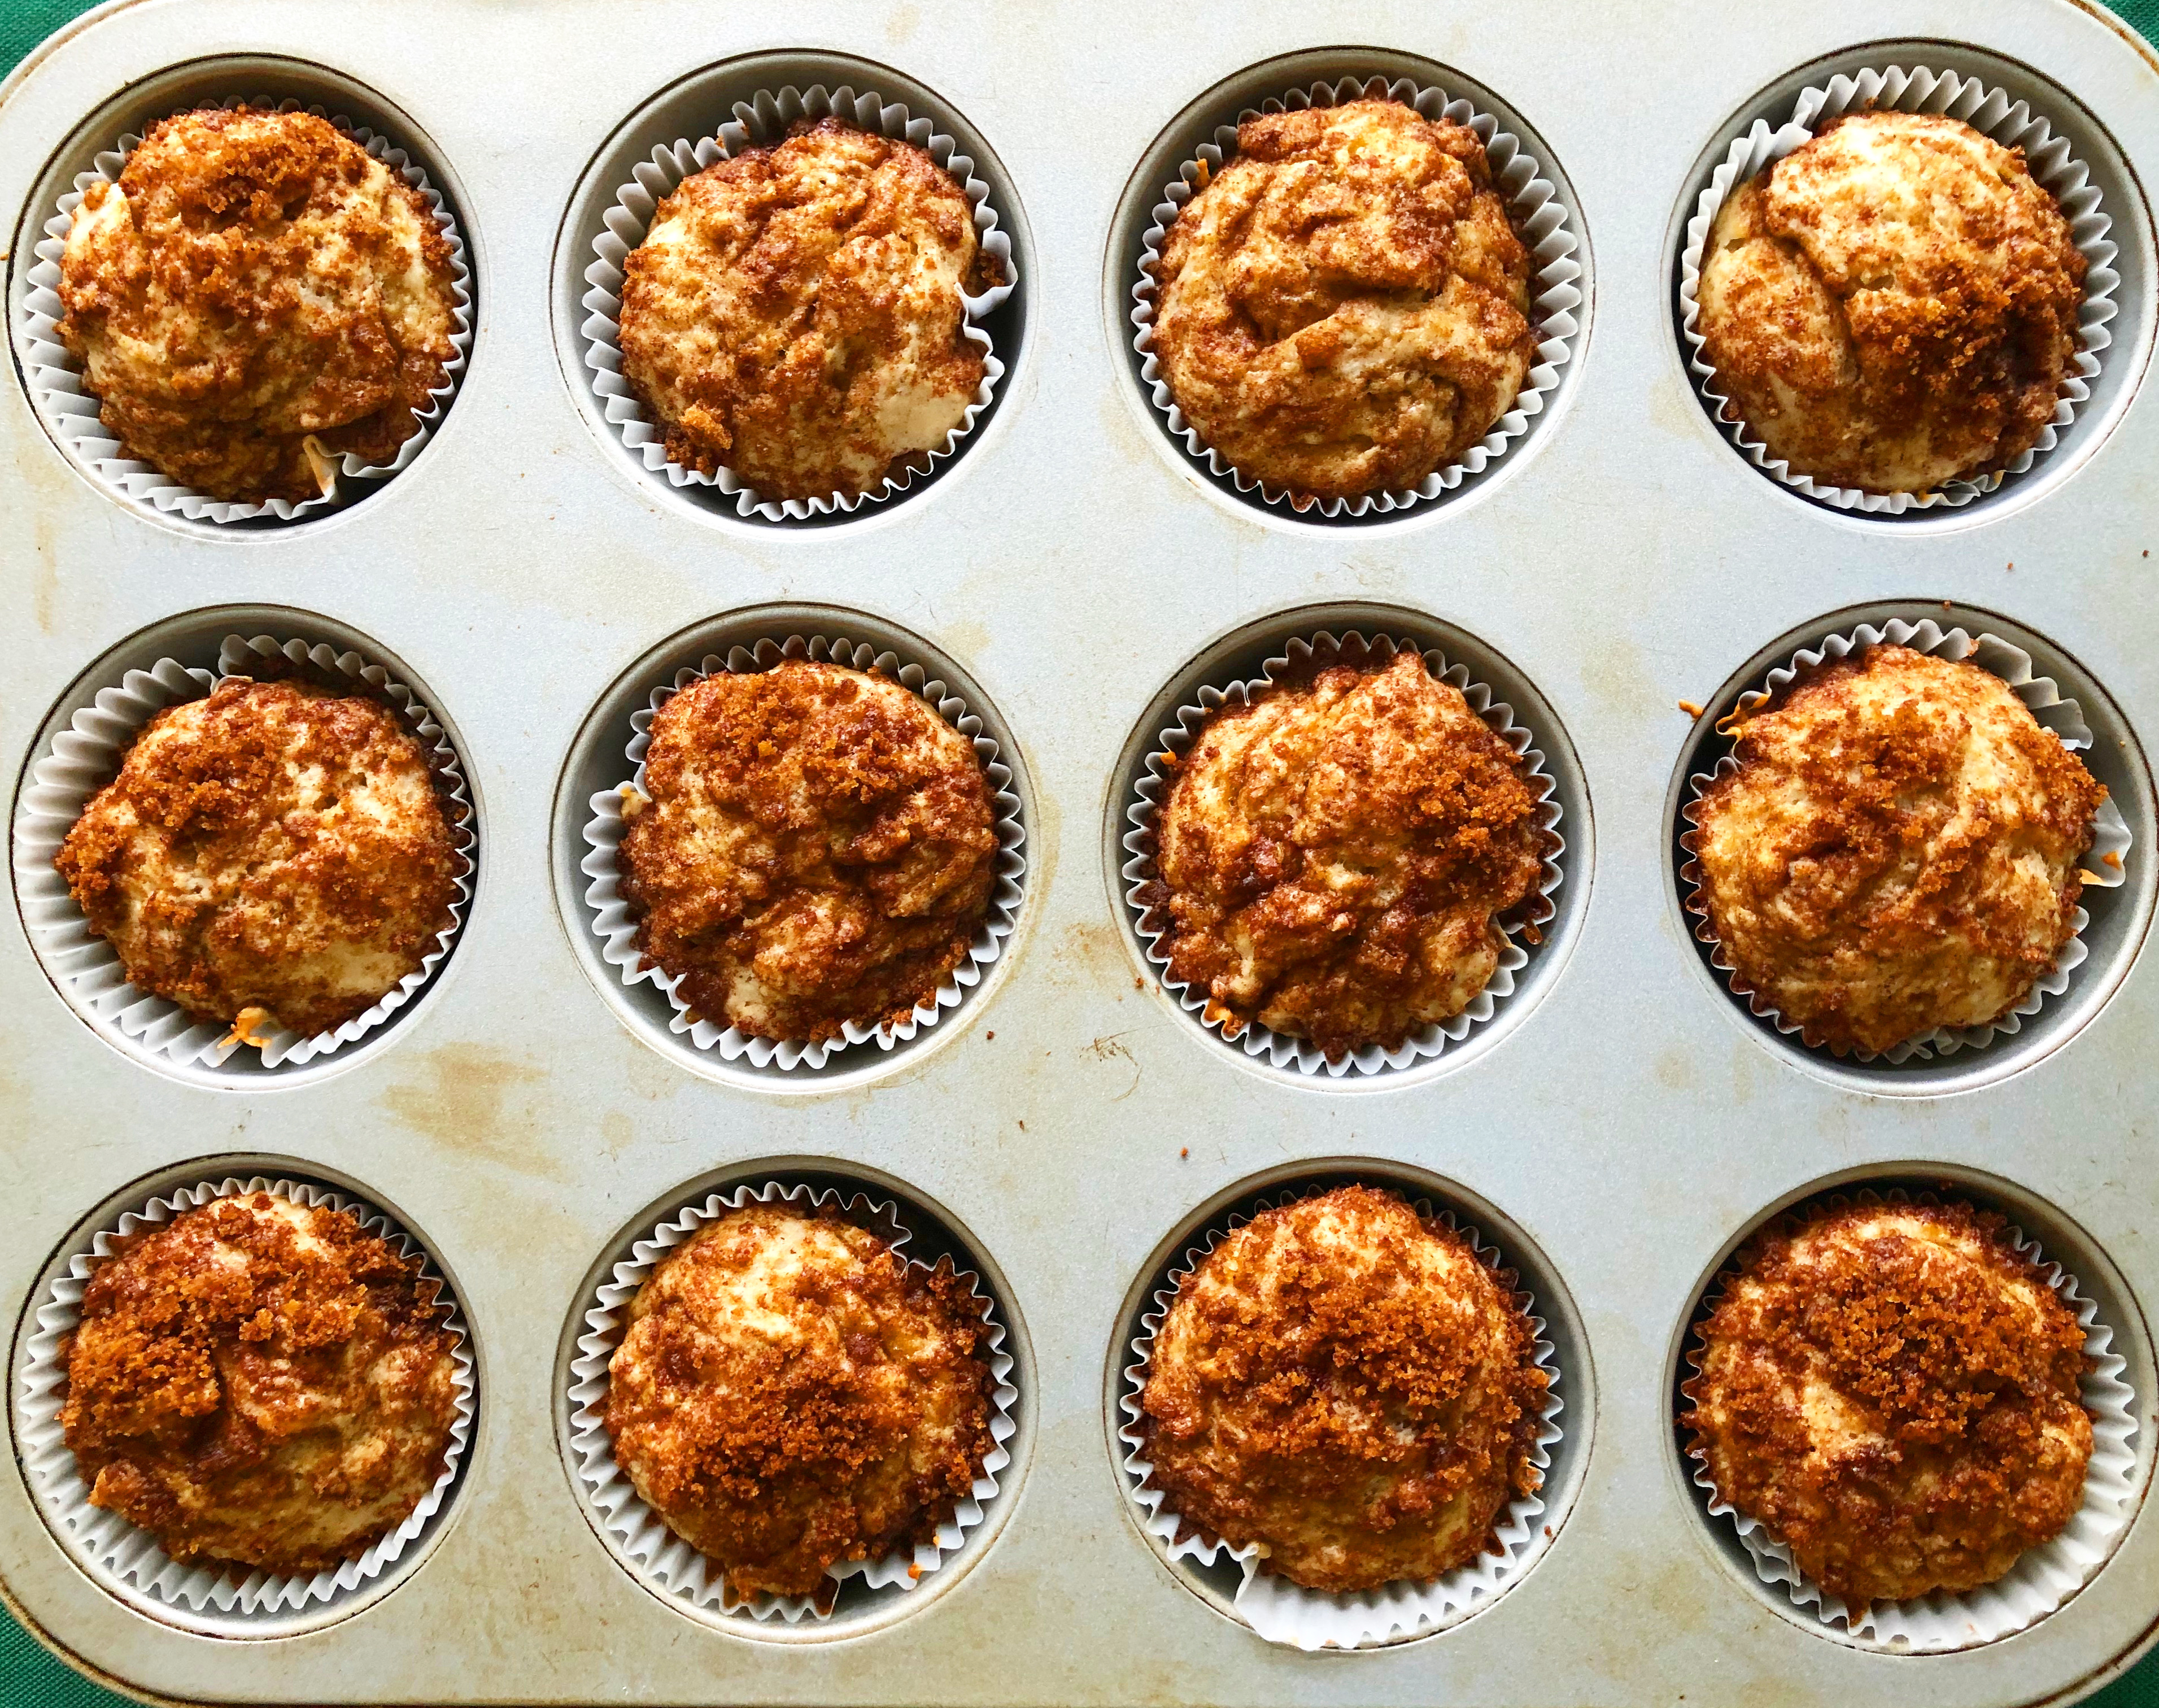
I decided to make these vegan cinnamon swirl banana muffins the other day when I had a lot of almond milk to use up, and two very ripe bananas. I was going to make banana bread, but I feel like that’s been a broken record baking project during the pandemic.
Plus, these muffins are more fun to make. You whip up the batter and then create a cinnamon sugar swirl mix (which is basically just sugar and ground cinnamon). You place a little batter at the bottom of a muffin line or greased muffin cup, sprinkle on some topping, swirl it with a toothpick or skewer, and repeat until you’ve used up all the batter and filled the cups most of the way.
I’ve had a couple muffins for breakfast with coffee every morning for the past few days and I’m still not sick of them. I know I’m offending a muffin god somewhere but I like to store mine in the fridge and warm them up in the microwave so they taste like they just came out of the oven.
My boyfriend liked these as much as I did, maybe more. They keep disappearing from the fridge, which is fine by me because I still haven’t finished the baking spree I started at the outset of the pandemic.
Here’s a song to get you started on your vegan cinnamon swirl banana muffins.
Vegan Cinnamon Swirl Banana Muffins
Ingredients
for the muffins: 2 large, very ripe bananas 1/2 cup almond milk
1 Tbsp ground flaxseed
2 Tbsp melted coconut oil
1 tsp vanilla extract
1 1/2 cups all-purpose flour
1/4 cup plus 2 Tbsp sugar
2 1/2 tsp baking powder
1/2 tsp salt
for the cinnamon swirl topping:
1/2 cup dark brown sugar
2 Tbsp all-purpose flour
1 Tbsp ground cinnamon
1 Tbsp melted coconut oil
Directions
Preheat the oven to 350 degrees F. Line a muffin tin with paper cups or grease it well. Set it aside.
Mash the bananas in a stand mixer and then mix in the almond milk, flaxseed, melted coconut oil, and vanilla extract. In a separate bowl, sift together the flour, sugar, baking powder, and salt. Add the dry ingredients to the wet and mix until just combined.
Combine the ingredients for the cinnamon swirl topping in a small bowl. Place a little bit of muffin batter in each cup, then sprinkle on about a 1/2 tablespoon of cinnamon swirl topping. Using a toothpick or a skewer, swirl the cinnamon mixture into the batter. Repeat with the rest of the batter and cinnamon topping. If you have any cinnamon mixture leftover, sprinkle it on top.
Bake the muffins for about 22-23 minutes or until they’re golden brown and spring back to the touch. Let cool for a few minutes in the tin and then remove to cool the rest of the way on a wire rack. Store in an airtight container in the fridge. Enjoy!
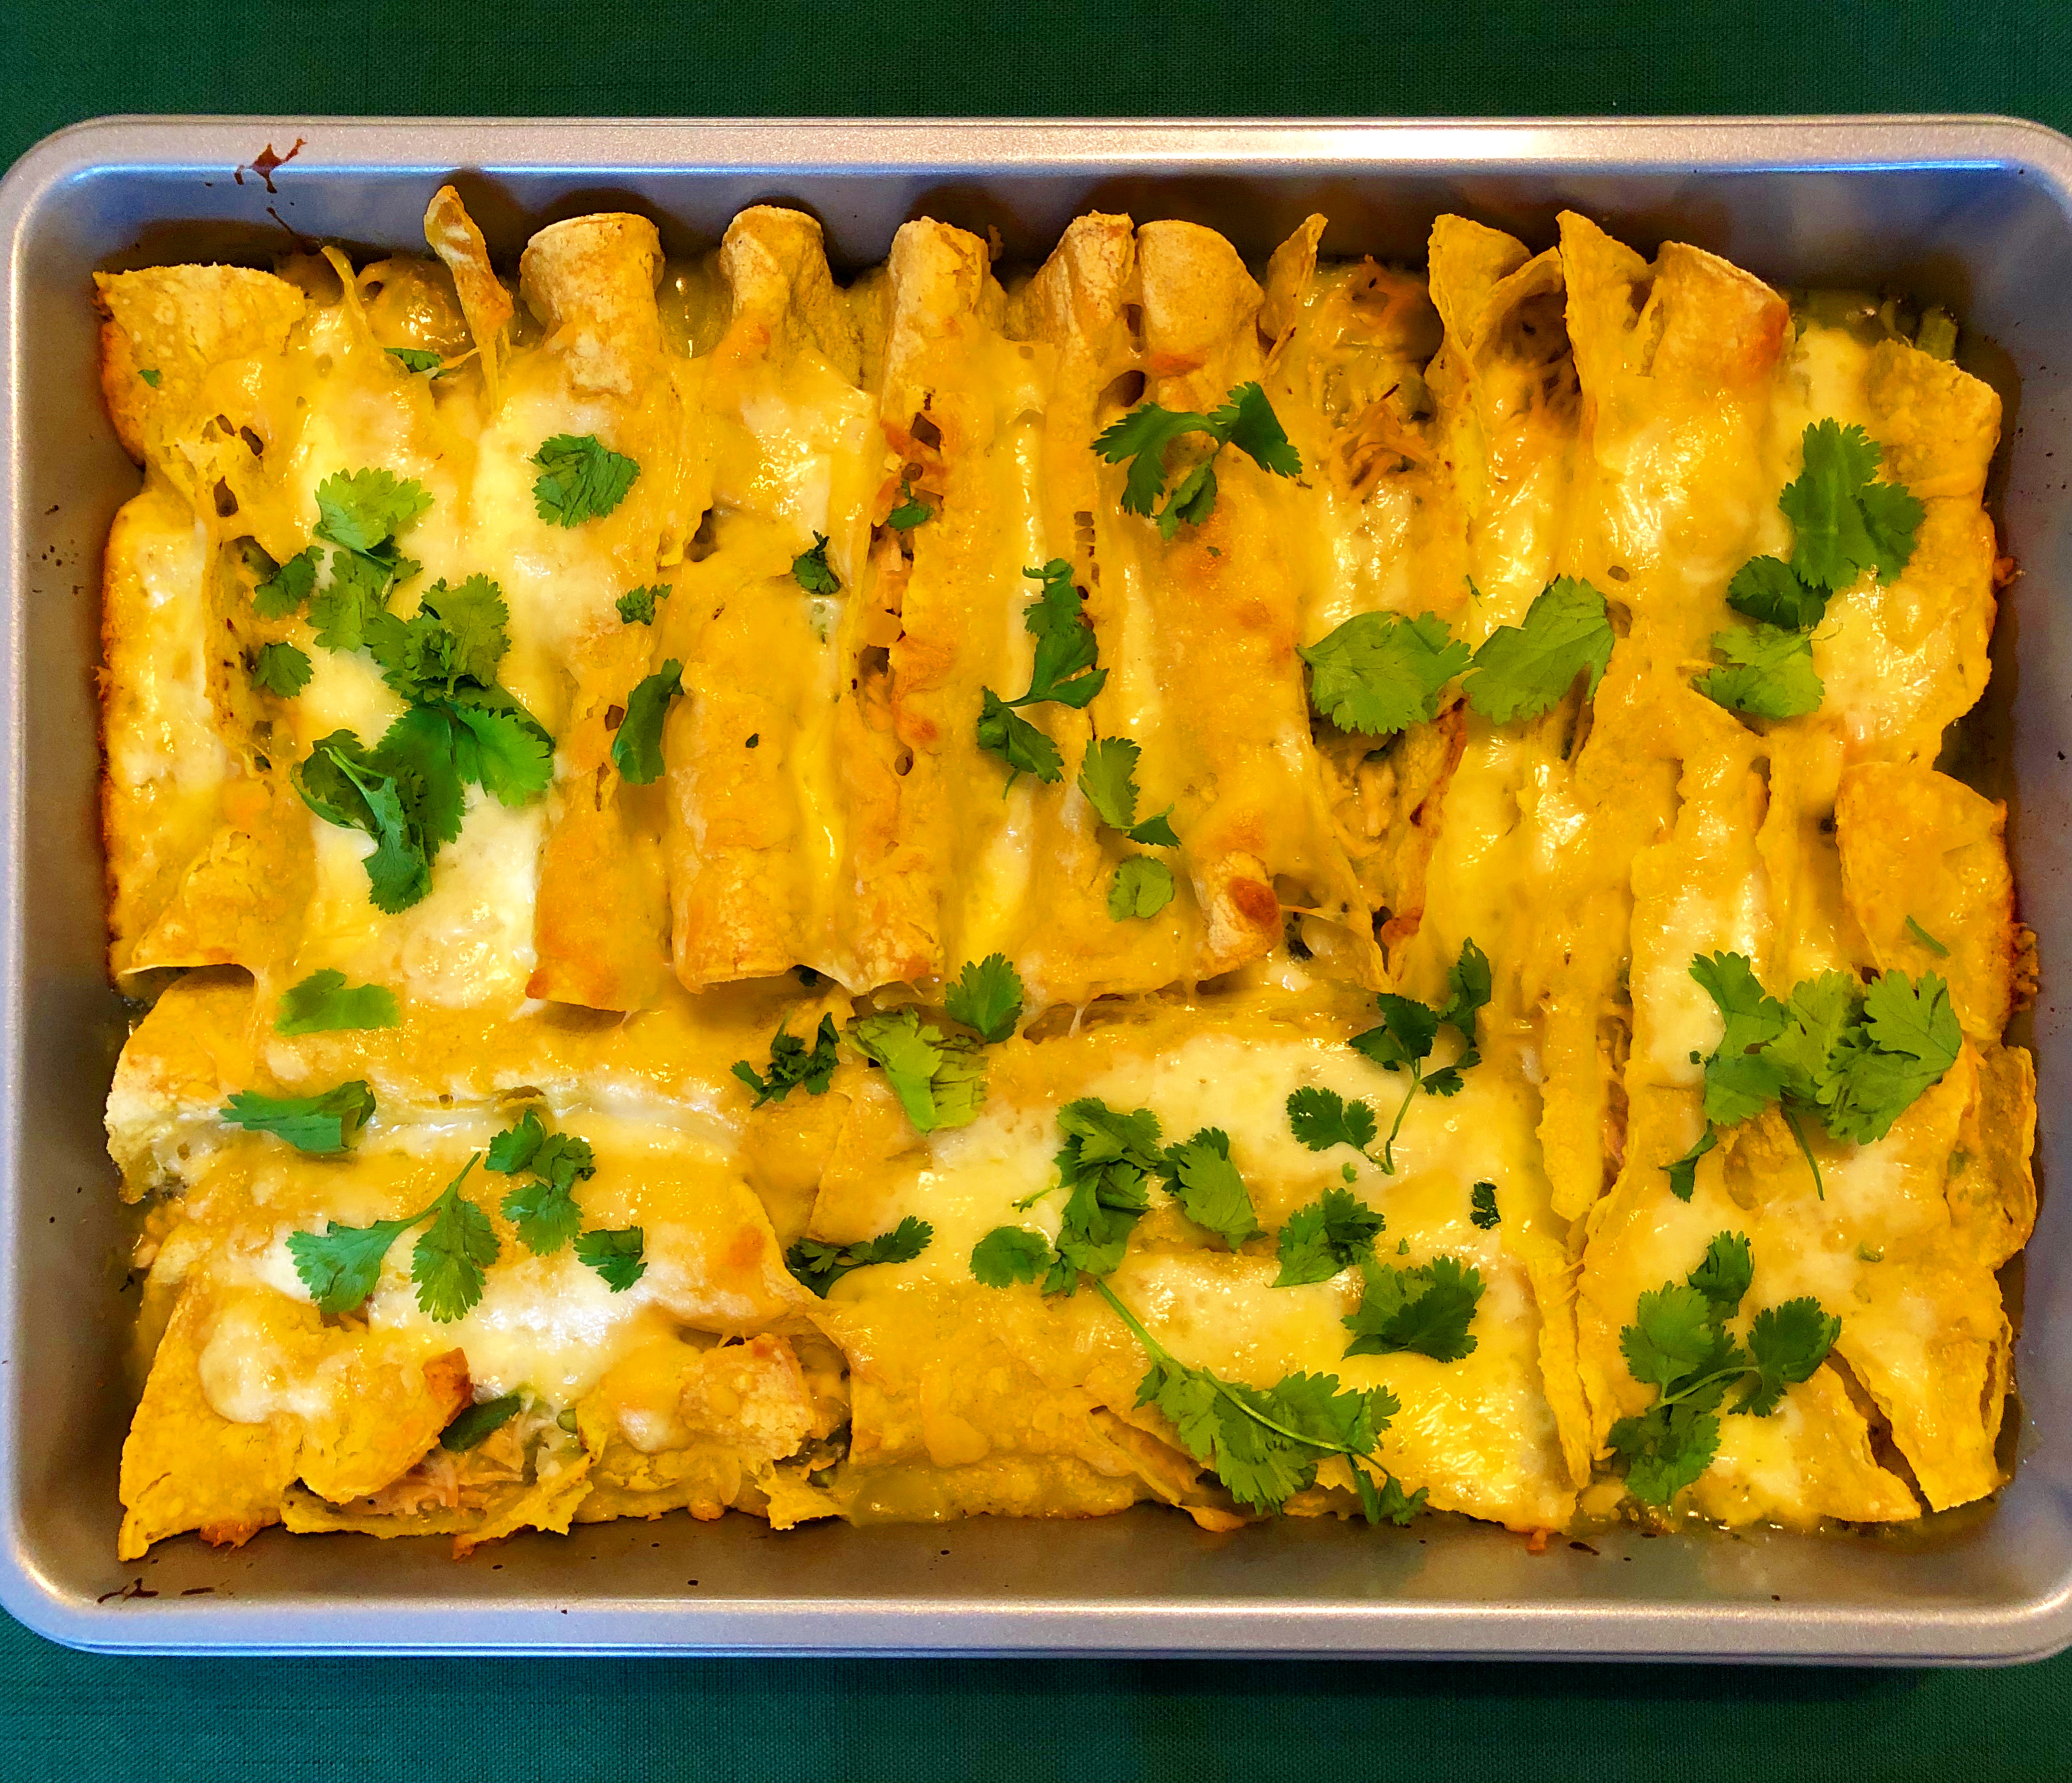
The other night I made some really good Swiss chard and white bean tacos, but then I had a bunch of corn tortillas left over. I also had some asparagus from my last farmers’ market delivery, so I decided to make asparagus enchiladas for dinner Sunday night.
I know asparagus and enchiladas don’t really sound like they go together, but trust me, they do. For these enchiladas, you cut up the asparagus into semi-small pieces and then put them directly into the filling. You don’t have to cook them beforehand. If you did, the asparagus would become too soft and mushy. No one wants mushy asparagus.
I used shredded chicken in these tacos but you could use any kind of shredded meat including one from pre-roasted chicken. The idea is to get the meat very soft and tender beforehand when you roast it, and then it gets even softer as it bakes inside the tortillas. My boyfriend and I agreed that the chicken was one of the best parts of this dish.
My other favorite part is the sauce. You can use jarred or canned green taco sauce to save time, but if you have a little extra time, I’d highly recommend making it from scratch. I used a pound of husked tomatillos, white onion, cilantro, jalapeño, lime, and garlic to make my sauce. I didn’t use any ground spices because the sauce had plenty of flavor on its own.
Make sure you save about half of the sauce to pour over the stuffed tortillas once you put them in the baking dish. Then you can cover the whole thing with a healthy portion of Monterey Jack cheese. I don’t often cook with Monterey Jack, but it’s perfect in this dish. The cheese melts down well and holds everything together. I’d recommend turning on the broiler for a minute at the end of baking the enchiladas so the cheese on top gets brown and bubbly.
Here’s a song to get you started on your asparagus enchiladas journey.
Asparagus Enchiladas
Ingredients
for the green salsa:
Extra-virgin olive oil
1 pound tomatillos, husked
1 white onion, sliced
4 garlic cloves
2 jalapeños, seeded and sliced in half
1 tsp salt
1/2 cup chopped cilantro leaves
1 lime, juiced
for the chicken:
2 large boneless, skinless chicken breasts, salted and seasoned 1-2 hours earlier and at room temp
salt and pepper to taste
1/4 cup chicken broth or water
for the enchiladas:
small corn tortillas
Extra-virgin olive oil
1/2 medium onion, diced
3 garlic cloves, chopped
1/4 cup all-purpose flour
2 cups chicken stock, store-bought
chopped cilantro leaves
2 pounds shredded chicken breast
2 Tbsp sour cream
1 bunch of asparagus cut into 1-inch pieces
salt
freshly ground black pepper
1/2 pound Monterey Jack cheese, shredded
Directions
First, make the salsa. Preheat the oven to 400 degrees F and spread the tomatillos, sliced onion, garlic, and sliced jalapeños on a prepared baking sheet. Drizzle olive oil on top. Roast for 15 minutes. Remove the vegetables and the juices from the baking sheet and put them in a food processor. Add the chopped cilantro leaves and lime juice and pulse until the mixture is salsa-like but still chunky. Set aside. Change the oven temperature to 375 degrees F for the chicken.
To make the chicken, preheat oven to 375 degrees F. Place the chicken breasts in a tin foil-lined baking dish and season both sides with salt and pepper. Pour in the water or chicken broth and cover with foil or a lid. Bake for about 30 minutes, or until chicken is cooked through and has an internal temp of 165 degrees F. Transfer the chicken breasts to a stand mixer fitted with a paddle attachment and beat on medium until they’re shredded. If you do not have a stand mixer, transfer the chicken to a large, shallow bowl or cutting board and shred it with two forks. Put it in a bowl for later. Reduce the oven temp to 350 degrees F.
Heat olive oil in a large pan over medium heat. Add the diced onion and cook for about five minutes until it’s caramelized. Add the garlic and cook until fragrant. Sprinkle on the flour and then pour in the chicken stock, stirring the whole time so the mixture doesn’t clump. Cook over a low simmer, stirring most of the time, until the mixture thickens. Turn off the heat and fold in the shredded chicken, sour cream, and asparagus and add salt and freshly ground black pepper to taste.
Warm the tortillas over an open flame over a gas grill or by reheating them in the microwave until they’re soft and pliable. Pour half the salsa into the bottom of a 9×13 pan and spread it out so it completely covers the bottom. Fill each tortilla with a little bit of the chicken mixture, sprinkle some cheese on top, and roll it up so it looks like a cigar. Place seam-side down in the baking dish with the salsa. Continue this process until the baking dish is full. Then pour on the other half of the salsa, making sure you cover most of the tortillas, and sprinkle on the rest of the Monterey Jack cheese. Bake uncovered for about 30 minutes or until the cheese is bubbly. If you want, you can broil it on high for a minute or two at the end to make the top brown and more bubbly, but make sure you keep an eye on it if you do. Enjoy!