Dimanche (That Means Sunday)

32B9504A-3ED1-4F3B-89BB-BA642C9A8827.JPG
Welcome to this edition of Dimanche (That Means Sunday), a roundup of things that caught my eye this past week.

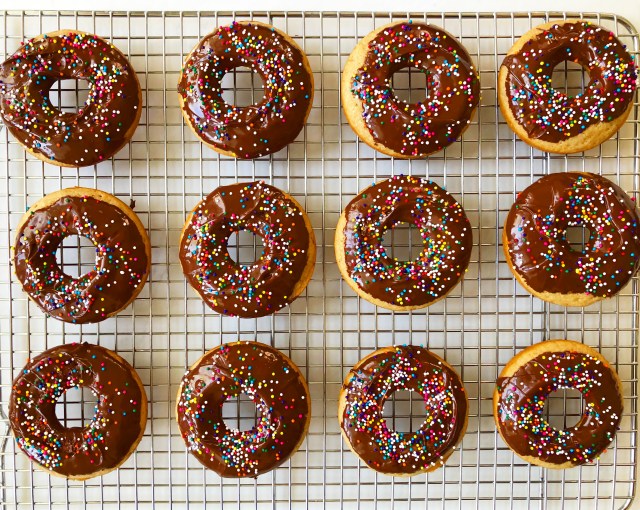
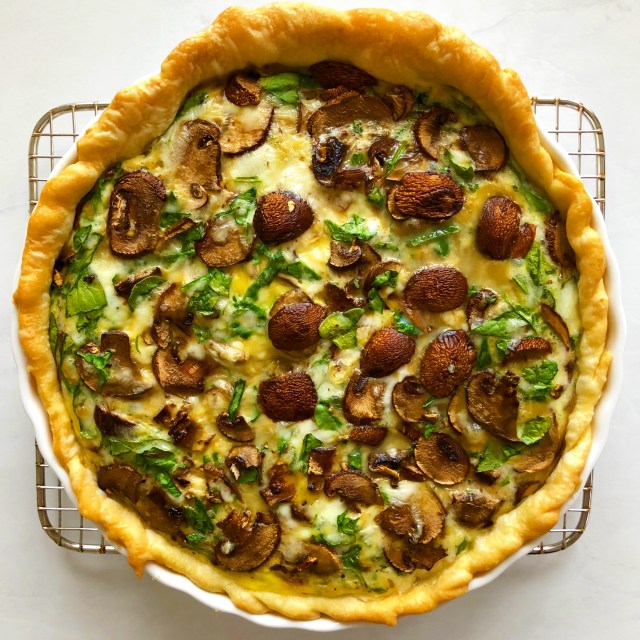
Last week I spent more time indoors than the previous one. I think it’s partly because I’m starting to freak out about going outside, and partly because I was knee deep in a bunch of baking projects. I made baked doughnuts for the first time, and then Friday and Saturday, I took a big leap and made my first loaf of sourdough bread.

I’ve wanted to make sourdough for more than five years. It all started when I lived in DC and I read a book by a local author describing his process of making bread. I even reached out to him and asked for some of his sourdough starter. He agreed, but then I moved to St. Louis and I shelved the project for a while.

Then, when the pandemic started in March, I decided to revive it. It happened before the trend (I swear) when I saw that a local bakery, KNEAD, was selling some of its sourdough starter for curbside pickup. I picked up a little and started the project a couple weeks ago.

I’ll dedicate a whole post to sourdough bread baking later, but for the purposes of this post, let me just say that making sourdough bread is a process. If you’re not ready to devote some time, effort, and money for all the tools you’ll need, you’d better stick to cookies and brownies.

Overall, the process isn’t too bad, especially if you’ve worked with any kind of bread dough before. However, it does take a lot of time and attention. I’ve recommended a couple resources below that I used and I think are helpful. I was very nervous throughout it all, but in the end I made a pretty decent loaf that was crispy on the outside and soft and chewy on the inside. In the end, that’s all I could ask for.

I hope this time spent indoors inspires you to start a project you’ve been putting off, whether it’s food-related or not.

Without further ado, here is Dimanche:

I wish we had New Zealand’s approach to the pandemic. I give a lot of credit to New Zealand Prime Minister Jacinda Ardern for her approach to flattening-nay, demolishing-the curve. I really think a similar strategy in the U.S. would help, but unfortunately, the CDC doesn’t listen to my opinion. Read more in this Forbes piece.

The COVID-19 pandemic has inspired at least one moment of grace in the dining world. Apparently Canlis, one of Seattle’s top fine dining restaurants, is offering delivery, and they sent an email to everyone who ordered a meal explaining that they needed to heat it up at home. The person who sent the email forgot to blind copy everyone, so responses went to everyone who ordered. One disgruntled and very entitled customer replied all complaining that he’d have to heat the meal up at home. In the end, other customers put him in his place and the group (including that guy) decided to donate to Feeding America. Read more about the happy ending in this Plate story.

I trust Samin on most things, but especially now when home cooking is vital. I will still hoard flour, contrary to her advice, but I liked what she had to say about how to stock your pantry and economize during the pandemic. Read more advice from Chef Samin Nosrat in this Vogue Q&A.

I think it’s important to keep dreaming during this time, especially about trips that we want to take when it’s all over. I love this AFAR piece about how to spend a day in Paris. It brings back a lot of memories and makes me think about what I want to do next time I visit. Check out the full story here.

An article about pasta shapes for our emotional state is something we all need right now. I feel like I’ve been orecchiette a lot lately, but generally I’m farfalle. Meet your match in this Bon Appétit piece.

Folk legend John Prine passed away this past week from complications related to coronavirus. I was very sad to hear it, as I’m a big fan of Prine’s music. Read more about his songs and his legacy in this NPR article.

Freezing food is a must right now, and this article offers some great tips. I’ve frozen a lot of soup, baked goods, and butter, but this story gives you tips on how to do it thoughtfully. I need to start making an inventory because the other night, I mistook one set of cookies for another. Get the tips in this 5280 Magazine story.

As I mentioned before, I made some sourdough bread and I’m on top of the world. If you want some tips, I’d highly recommend checking out The Perfect Loaf blog and this video on scoring bread. Both helped me feel more confident while I was baking.

Enjoy your week! Here’s a song to get you started.

Posted in Dimanche (That Means Sunday), Uncategorized | Tagged , , , , , , , , , , , , , , , | Leave a comment

Baked Doughnuts with Askinosie Chocolate

66FB2A82-43C0-406D-B3AC-087DBFDA1233.JPG
I was craving doughnuts the other day, so I decided to make a big batch of them for breakfast Friday morning.

I love doughnuts of all shapes and sizes: Baked, fried, glazed, frosted…As long as it’s sweet and fluffy with a hole in the middle, I’ll probably enjoy it. However, I’m inclined to prefer baked doughnuts when I make them at home.

Why? you may ask. It’s because frying doughnuts at home is a tricky business and it rarely results in the same texture and mouthfeel as doughnuts you buy at a bakery. Maybe there’s an expert fryer out there with all the right equipment, but when I try to make doughnuts in a vat of hot oil in my own kitchen, they always end up tasting weird. I really think it comes down to equipment and technique.

However, if you make baked doughnuts, you don’t have to worry about all that. You can mix up a batter similar to one you’d make for a cake, you fill in some doughnut molds, and then you bake the doughnuts for a bit in the oven until they’re fluffy and golden brown on the bottom.

The only tricky part about making baked doughnuts is filling in the molds. You can do this with a spoon, but it’s a little more time consuming and messy than if you use a pastry bag with a piping tip. I’d highly recommend the latter. You don’t even need a piping tip; you can grab a large plastic bag, put all your batter inside, and then cut a small triangle off a corner to pipe batter into the molds.

I melted some Askinosie chocolate for the top of each doughnut and put some rainbow sprinkles on top. One of my favorite parts about doughnuts is there’s usually a decent amount of surface area, so you can get creative with toppings. I might do some strawberry cardamom doughnuts this week. Stay tuned.

In the meantime, I’ll leave you with this song.

Baked Doughnuts with Askinosie Chocolate

Ingredients

for doughnuts:
1 1/2 cups all-purpose flour
1/2 cup granulated sugar
2 tsp baking powder
1/4 tsp salt
1/2 tsp ground cinnamon
1/4 tsp ground nutmeg
3/4 cup (180 ml) unsweetened almond milk
1 tsp vanilla extract
2 Tbsp unsweetened applesauce
5 Tbsp butter, melted

for chocolate topping:
1 cup (175g) chopped chocolate (I used Askinosie)
sprinkles

Directions

Preheat the oven to 350 degrees F. Liberally spray two doughnut molds with cooking spray and set aside.

Mix the flour, sugar, baking powder, salt, cinnamon, and nutmeg in a big bowl. Whisk together the almond milk, vanilla extract, applesauce, and butter, and then mix it into the bowl with the dry ingredients. Mix until there’s no big clumps or lumps or traces of flour.

Pipe or spoon the batter into doughnut molds, filling 2/3 of the way to the top. Bake the doughnuts for 15 minutes until they’re light golden brown on top and spring back to the touch. Remove them from the oven and allow them to cool completely on a wire rack before topping with the chocolate.

To make the chocolate, bring a small pot of water to a simmer and set a heatproof bowl with the chopped chocolate on top. Stir the chocolate with a spatula until it is completely melted. Remove the bowl with the chocolate from heat.

Take a cooled doughnut and quickly invert it in the chocolate so the top is coated. Place it on a wire rack. Repeat the process for each doughnut, and then top all of them with sprinkles. Enjoy!

*You can put the doughnuts with chocolate and sprinkles in the fridge to let the chocolate harden up. Then, store the doughnuts in an airtight container for a couple days at room temperature or a week in the fridge. I put mine in the fridge and warm them up for 20 seconds in the microwave.

Posted in Breakfast, Brunch, Chocolate, Uncategorized | Tagged , , , , , , , , , , , , , , , , , | Leave a comment

The Best Blueberry Muffins Ever

B214E9D3-99B6-470F-884E-3DF26C779C8B 2.JPG
We could all use some blueberry muffins in our lives right now.

I made these Saturday morning for breakfast and they were just what the doctor ordered. You mix some flour, milk, and brown sugar together, add a healthy helping of blueberries, and then spoon batter into each muffin cup.

I lined my muffin cups with parchment paper. If you’re low on muffin liners or you just want to try something new, I’d highly recommend giving them a try. All you have to do is cut parchment paper into 5-inch squares, and then you push it into a muffin cup. If you spray the muffin tin with some cooking spray ahead of time, it will help the paper adhere to the sides. Another trick is taking a small object like a cherry or grape tomato or a pie weight, and putting it on top of the paper to hold it down before you pour in the batter.

These muffins get a boost from cornstarch, an ingredient you don’t see too often in muffins. Usually, you see it in pies as a thickening agent for fillings. In these muffins, cornstarch makes the finished product more light and fluffy. I also think it helps the blueberries from becoming mushy, but that could just be my imagination. It definitely helps create muffins that are more tender.

I ate these after they slightly cooled with some salted butter from my farmers’ market delivery basket. My favorite way to eat fresh muffins is to split them open slightly, put in some butter, and then push it gently back together so the butter melts and makes the muffin even more soft and tender.

In other news, I heard John Prine passed away last night from complications related to the coronavirus and it was a rough blow. I love Prine’s music. Check out my Prine playlist to listen to some of my favorite songs. You should also listen to this cover of “You Got Gold” by my supremely talented friend, LeAnn Fisher.

The Best Blueberry Muffins Ever

Ingredients

nonstick baking spray (or vegetable oil)
1 1/4 cups all-purpose flour
1/2 cup granulated sugar
1/4 cup packed brown sugar
1/4 cup cornstarch
2 tsp baking powder
1 tsp kosher salt
1/2 tsp ground cinnamon
2 slightly heaping cups (12 ounces) fresh or frozen blueberries (I used fresh)
1/2 cup milk (I used 2%)
2 Tbsp unsalted butter, melted
1 1/2 tsp pure vanilla extract
1 large egg
1 Tbsp granulated sugar plus 1 Tbsp brown sugar for topping
salted butter for serving

Directions

Preheat the oven to 400 degrees F. Spray a 12-muffin tin with baking spray and line it with muffin cups or parchment paper.

Whisk together the flour, sugars, cornstarch, baking powder, salt, and cinnamon. Add the blueberries and toss to coat. In a separate bowl, mix together the milk, melted butter, vanilla extract, and egg. Pour the liquid ingredients over the dry ingredients and use a spatula to fold the ingredients together. Mix until just combined. There can be a few lumps.

Spoon the batter into the prepared muffin cups, leaving a little room at the top of each cup. Sprinkle the top of each muffin with the granulated sugar/brown sugar mixture.

Bake the muffins for about 20 minutes, rotating the tin halfway through baking. It could take a little longer depending on your oven, so keep an eye on things. The tops should be golden brown and a toothpick inserted in the center should come out clean (except for berry juice).

Let the muffins cool on a wire rack for a few minutes before serving. I like mine with salted butter. Enjoy!

Posted in Breakfast, Brunch, Muffins, Uncategorized | Tagged , , , , , , , , , , , , , , , , , , , | 1 Comment

Pint Size Oatmeal Crème Pies

4E0D55CA-B4C4-499A-BE1A-00E31C0ED2D1.JPG
As I’ve mentioned before, one of the hardest parts about quarantine for me is not making weekly trips to my favorite bakeries in town. One of my favorites is Pint Size Bakery in South City.

Pint Size is the kind of place go if you want to get in a good mood. Stepping through the door is a little like entering pastry wonderland. There’s brightly colored floral wallpaper, whimsical, holiday-themed decorations like heart mobiles or Christmas tinsel, retro tables, and my favorite spot, a window seat with high chairs, succulents, and a tiny bird figurine.

The staff is really friendly and they put up with me while I take 10 minutes to make a decision about what I want. Because honestly, I want everything. How can you not? I usually narrow it down to a couple things for there with a coffee, and a couple to go.

One of my favorite items is their oatmeal crème pie. Picture two soft, golden oatmeal cookies with just the right amount of brown sugar and butter, with light, fluffy marshmallow cream in between, and you’ll land somewhere close to these cookies. They’re rich and reassuring, and they take you back to childhood, when snacks were plentiful and life was a little less complicated.

I had no idea until I read the recipe and intro in Feast Magazine that Christy Augustin, owner of Pint Size Bakery, created these cookies for Simone Faure, chef and owner of La Patisserie Chouquette, one of my other favorite bakeries in town. Apparently, Simone was begging for Little Debbie oatmeal crème pies for her birthday, and Christy delivered. I kind of love the fact that these cookies were the product of a conversation between two talented pastry chefs.

These cookies are a project; they take some time, patience, and a little bit of extra effort. After all, you have to first make the cookies, then let them cool, then make the filling, and finally pipe that filling into the middle of a bunch of cookies before sandwiching them together. They’re not as simple as slice-and-bake or your go-to chocolate chip cookie recipe, but they’re so satisfying.

Plus, if you have a little extra time on hand because of quarantine, they’re the perfect thing to make. I’m really into cooking projects lately. If not now, when?

Some tips for making these cookies: One, freeze the balls of dough the night before. The recipe tells you to do this, but I’m reiterating it. It will create cookies that are lighter and have a more uniform consistency.

Two, keep an eye on the cookies as they bake in the oven. If you’re like me and you don’t trust your oven, invest in an oven thermometer. They’re actually very affordable. This is the one I have. It’s a life saver with baked goods. You’d be surprised how much the temperature in your oven fluctuates. Make sure your oven temp is right around 375 degrees F the whole time, or just check your cookies occasionally. You want them golden brown on top and soft in the middle. They’ll harden up a little as they cool.

Finally, wait to make the marshmallow crème until after your cookies have cooled down all the way. Don’t even think about putting on the marshmallow until the cookies are 100% cool. Trust me on this. No one wants a marshmallow river in their kitchen. Or maybe you do…but not for these cookies.

Enjoy baking! Here’s a song to get you started on your journey.

Posted in Cookies, Dessert, Uncategorized | Tagged , , , , , , , , , , , , , , , , , , , | Comments Off on Pint Size Oatmeal Crème Pies

Dimanche (That Means Sunday)

226925F1-D6DB-4678-B5C2-53F8E000A854
Welcome to this edition of Dimanche (That Means Sunday), a roundup of things that caught my eye this past week.

I’ve debated about whether or not to write this post because staying at home during coronavirus isn’t a joke. For a lot of people, it’s physically and mentally grating. But I have to be honest and say, I’m having a great time.

Yes, I still wish I could go out on long walks and make impromptu trips to coffee shops and bakeries like I used to, but there’s a lot to be said for staying in one place. It has eliminated a lot of distractions, so now I’m basically forced to focus on making the most of the alone time. For me, that has involved lots of baking, cooking, painting, writing, drawing, and other creative pursuits that I tossed to the side before when I was either too stressed or didn’t have enough time.

I’m also finding ways to exercise, and to be honest, I feel more in shape than when I would go lift weights at the gym or get on the treadmill. I have a fire stick so I pop up YouTube exercise videos on my TV and do workouts in my living room. It has reminded me that generally speaking, I do better when I’m in an exercise class and I have a teacher telling me what to do. I’m doing barre and exercise circuit videos, including ones with some kickboxing, which I’ve missed since my Groupon to a boxing gym expired.

Also, the pandemic has made it easier, not harder, to stay in touch with people I care about. I check in with friends through texts and phone calls. I have FaceTime lunch once a week with one of my best friends, Julicia, and we never had the chance to do that before.

I guess what I’m trying to say is, there are a lot of obvious bad things about being in quarantine, but there are lots of good things, too, if you can find them. Maybe it’s just about giving yourself permission to do the things you’ve been wanting to do, and realizing that there’s really no excuse for not doing them.

I was packing some boxes the other day (yes, I’m moving in all this craziness), and I found a book that I bought in DC. It was one of those “believe in yourself” type of books where you fill in answers about what you really want out of life, your goals, etc. I was surprised that some of the things I wrote in 2015 still ring true today.

I was also struck by one page that said to do what you love everyday. I think it’s true. We need to make a little time everyday to do something we love. Otherwise, it’s easy to lose the essence of who we really are. That’s something I’ve considered a lot throughout quarantine.

Without further ado, here is Dimanche:

I made the best blueberry muffins of my life yesterday. That is not an exaggeration. I put lots of brown sugar and cinnamon in them because I think the more of that, the better. I’ll put the recipe on the blog this week. I’ll also include instructions for how to make homemade muffin cups out of parchment paper. B214E9D3-99B6-470F-884E-3DF26C779C8B

In France, everyone is talking about the “guerre des masques,” or “war of the masks.” Basically, people in the French government are saying that the U.S. government paid China cash bribes to reroute masks meant for their country to our country. Even though the U.S. has neither confirmed nor denied (obviously), there’s a good chance that the story is true. Read more about the situation in this CNN story.

Speaking of masks… The CDC said last week that everyone in the U.S. should wear one when we leave the house. However, there was already a lot of debate surrounding masks and how the coronavirus travels through the air. If you’re like me and you wonder if it’s safe to go outside, you should probably check out this story in The Atlantic.

I unwittingly joined a trend when I decided a few weeks ago to finally tackle sourdough bread baking. A friend of mine bakes bread often, and it inspired me to give it a try. A local bakery in St. Louis recommended this website, The Perfect Loaf, for bread baking tips and resources. It’s helped me a lot so far.

Entertainment including movies and TV is a great way to pass the time during the pandemic. I especially enjoyed this story about famous actresses reacting to opera in movies. I never thought about it, but those scenes are always powerful and generally do a lot to move the plot along. Check out the full story in The New York Times.

Have I mentioned how much I love Ina Garten during a crisis? Ina took to social media this week and instructed everyone how to pour giant cocktails midday. It inspired more than a few commentaries in news outlets including The Washington Post. I especially enjoyed this one in the Washington Post, where the author follows Ina’s instructions, serves herself and her husband giant margaritas, and concludes, “Alone, I sip the concoction and think of the things I learned from Ina today. Like that in times of crisis, traditions such as cocktail hour can feel grounding — even if they aren’t in exactly the right place. And that I shouldn’t care how this looks, a woman sitting in front of her computer, ostensibly in the middle of a workday, guzzling a massive margarita.”

If you love to travel like I do, you might find quarantine a little paralyzing. But as The New York Times reminds us, we can still travel from home (sort of…I guess). I enjoyed this take on their 36 Hours column, which usually recommends where people should go during a quick trip to a certain destination. There are plenty of ways to travel remotely; you just have to be creative.

I’ve enjoyed hearing what different people are doing during quarantine. I randomly saw this blog post by Michael Krikorian, a journalist based in LA and the boyfriend of Nancy Silverton, a famous LA chef best known for her work with Mozza restaurant and La Brea Bakery. The post, “In Lockdown at San Quarantine with Nancy Silverton as my Cellie,” describes Krikorian and Silverton watching a game show together. It’s mundane but somehow endlessly entertaining, kind of like game shows and reality TV themselves.

So apparently, Mindy Kaling hates food bloggers. I’m biased (obviously), but I’ve never had a problem with people writing a narrative before sharing a recipe, as long as the narrative is easy or fun to read. Has Kaling heard of cookbooks? She might be better inclined to that genre. Read more about the situation in this Washington Post story.

I’ve been researching ways to make fresh produce last longer to reduce trips to the grocery store. This guide from Cookie and Kate, a vegetarian food blogger, is great.

Have you heard of The Inn at Little Washington? I’d vaguely heard of it, but I learned a lot more after watching this documentary on PBS last night. If you’re interested in food or the restaurant industry, I’d recommend giving it a watch. It describes how the owner of the inn trained himself in classic French cooking, upended it, and made lots of money by starting a restaurant in a tiny town in Virginia.

Last but not least, goats are taking over Wales. Apparently mountain goats are roaming around Llandudno, a town in North Wales. They’re probably better than a majority of our current leaders, to be honest. Read more in this story from AFAR.

Enjoy your week! Here’s a song to get you started.

Posted in Dimanche (That Means Sunday), Uncategorized | Tagged , , , , , , , , , , , , , , , , , , , , , , , , , , | Leave a comment

Broccoli Casserole

50ED4A0E-6126-4909-934D-58D811E30601.JPG
Broccoli casserole is the ultimate comfort food. Tender pieces of broccoli, melted cheddar cheese, crunchy breadcrumbs on top…I’m tearing up a little just thinking about it.

My recipe keeps the best things about broccoli casserole, i.e. the cheese, broccoli, and breadcrumbs, while lightening things up a bit. I use quinoa for the base, so even though you’re basically eating cheese and bread, you can feel good knowing that quinoa is in there.

I also use 2% milk in the filling instead of cream. Honestly, it tastes better. I hate when cream and cheese compete for first place in a dish, and this avoids that scenario. It mixes well with the cheese and holds the casserole together.

I like to eat this on colder days, the ones that make you think it’s winter again even though it isn’t. That happens a lot in the Midwest during springtime, so it’s nice to have comfort food to turn to.

Also, the leftovers keep well for a few days, so you can double the recipe and eat it for a while. I think I ate my casserole for about three days and I didn’t get sick of it, which is a testimony to how good it is. I’m not a big leftovers fan in general, so anything that makes it past the two day mark is excellent in my book.

Here’s a song to get you started on your broccoli casserole journey.

Broccoli Casserole

Ingredients

2 cups vegetable broth
1 cup quinoa (any color), rinsed and drained
16 ounces broccoli florets from 2 large bunches of broccoli
2 Tbsp olive oil
3/4 tsp kosher salt
freshly ground black pepper
1/4 tsp red pepper flakes
8 oz cheddar cheese, grated and divided
1 cup 2% milk
1/2 Tbsp butter
1 clove garlic, minced
1/2 cup-1 cup breadcrumbs (depending on how much you like on top)

Directions

Preheat the oven to 400 degrees F. Line a baking sheet with parchment paper or a silicone baking mat. Make sure your broccoli florets are cut into bite-size pieces. Toss them with 2 tablespoons olive oil until they’re coated, sprinkle with salt, and arrange in a single layer on the prepared baking sheet. Roast for about 20 minutes, or until the broccoli is tender and started to brown around the edges.

In the meantime, make the quinoa according to package instructions with the 2 cups of vegetable broth. When it’s done cooking, take the pot off the heat and set it aside to allow it to steam for 10 minutes.

Remove the broccoli from the oven. Reduce the oven heat to 350 degrees F. Stir the 3/4 teaspoon salt, some shakes of ground black pepper, and red pepper flakes into the pot with the quinoa. Reserve 3/4 cup of grated cheese, and mix the rest into the pot with the quinoa. Pour in the milk and stir until everything is combined.

Heat some butter over a small skillet over medium low heat. After it’s melted, toss in the garlic and sauté for a few minutes until fragrant. Add the breadcrumbs and toss everything together until the breadcrumbs are lightly toasted. Remove from heat and pour the breadcrumb mixture into a small bowl to use later.

Pour the quinoa mixture into a 9-inch baking dish and top with the roasted broccoli. Stir until everything is combined, then top with the rest of the cheese followed by the breadcrumbs. Baked uncovered for 25 minutes until the top is golden brown. Allow it to cool slightly before serving. Enjoy!

Posted in Dinner, Lunch, Uncategorized, Vegetarian | Tagged , , , , , , , , , , , , | 2 Comments

Spinach, Mushroom, and Gouda Quiche

FB983B1D-A53D-49BA-ACB5-1DE692339529.JPG
A couple weeks ago on Twitter, someone asked if they could eat quiche for breakfast. The real question is, when can you not eat quiche?

It’s one of the most versatile dishes. It makes a great breakfast by itself, it works for lunch with a salad, and it can be part of a dinner lineup to impress guests (not that we have many of those these days, anyway…).

It’s also a good thing to make to use up whatever you have lying around in the fridge. I had a bunch of mushrooms and a bag of spinach, and a block of Gouda that I couldn’t remember buying, so I combined everything in a quiche. I’m sure the French have more exacting standards for what belongs in a single quiche, but oh well. They would like how mine tastes.

My boyfriend makes quiche a lot and he always uses a premade pie crust. I know you think I’m about to tell you that’s a horrible idea, but I’m not. Actually, I think using a premade crust is great, especially if you’re running short on time and you don’t want to put in all the work it takes to make crust from scratch.

However, if you want to put in a little more work, you’ll be rewarded with a flaky, buttery crust that perfectly compliments your quiche fillings, and you’ll have the satisfaction of knowing that you made it yourself.

Also, if you master the crust recipe once, you can use it for almost anything. I use my crust recipe for pies, quiche, and basically anything else that needs a crust. It hasn’t failed me yet.

A few tips for making quiche: One, to check for doneness, look at the middle. If the quiche jiggles too much, it’s not ready. You want it to be set in the middle with minimal jiggle. Two, bake quiche on a baking sheet. You can place the pan with the unbaked quiche right on the sheet and stick it in the oven. That way, if anything sloshes over or a little egg gets out, you don’t have to worry about scraping your oven.

Third, you can use heavy cream or milk for the filling. Personally, I prefer milk because I usually have it on hand and I don’t have heavy cream, but using cream will make the quiche richer and more custard-like, which might appeal to you.

Here’s a song to get you started on your quiche journey. It takes me back to my younger years.

Spinach, Mushroom, and Gouda Quiche

Ingredients

for the crust:
1 1/4 cups all-purpose flour
1/8 tsp salt
10 Tbsp unsalted butter, cold and cut into cubes
4 Tbsp ice water
1 egg, lightly beaten (for brushing the crust later)

for the filling:
4 large eggs
1 cup milk (I used 2%)
1/4 tsp salt
1/4 tsp pepper
2 cups sliced fresh button mushrooms
1 cup shredded Gouda cheese
1 cup chopped fresh baby spinach

Directions

First, make the dough for the crust. Pulse together the flour, salt, and butter in a food processor until pea-sized balls form. Then pulse in a tablespoon of ice water at a time until the dough comes together in a ball. Remove it from the food processor and place it on a lightly floured work surface. Knead the dough a couple times then form it into a ball. Wrap the ball tightly with plastic wrap and place it in the fridge for two hours or overnight. I prefer to leave them in the fridge overnight. Don’t worry if your dough is a little wet and sticky at this stage. You can sprinkle a little flour on the dough later when you’re rolling it out.

In two hours or the next day, take the dough for the crust out of the fridge and let it come to room temperature. This takes about an hour. Flour a work surface and roll out the dough into a 13-inch circle. Grease a quiche pan or pie tin and carefully place the crust into the pan, pressing it in gently with your fingers. You can trim the overhang and form a pattern on the edge of the pan, or simply press the dough into the rim. Place the prepared crust in the freezer.

Preheat oven to 350 degrees F and set a rack in the lower part of the oven.

In a large bowl, whisk eggs, milk, salt and pepper until blended. Stir in remaining ingredients. Take the prepared crust out of the freezer. Pour the filling into the crust.

Bake the quiche on the lower oven rack for 30-35 minutes or until the crust is golden brown and the center of the quiche stops jiggling. Let it stand for 10 minutes on a wire rack before cutting into it. Enjoy!

Posted in Breakfast, Brunch, Dinner, Lunch, Uncategorized, Vegetarian | Tagged , , , , , , , , , , , , , , , , , , , , , | 2 Comments

Vegan Horchata

D81714EC-2109-464E-B8B0-BDD81959B441.JPG
Believe it or not, there are some good things about being in quarantine. One of them is the ability to take stock of what you have.

I’ve spent the past couple weeks doing a thorough inventory of my apartment, keeping what works and tossing what doesn’t. Of course, this extends to my refrigerator. I’ve thrown out some bags of plant-based flour (hello, June 2019 expiration date), consolidated some fruit, and found way more cashews than I ever knew existed.

I decided to make some cashew milk with the latter. Plant-based milk sounds scary to make at home, but it really isn’t. It’s all about technique, which comes with practice and patience. To make my cashew milk, I put two cups of cashews in a big bowl and covered them with filtered water. Filtered water is key here, because regular tap water can add some funky flavors to your finished milk.

Then I put a lid on the cashews in water and let it sit in the fridge overnight. I took them out the next day, drained them, rinsed them until the water ran clean, and then put them in a high-power blender with two cups of filtered water. I blended it on high for a couple minutes, and then I added another two cups of filtered water, four teaspoons of vanilla extract, a pinch of sea salt, and three tablespoons of maple syrup. I blended it on high again for about a minute.

At this point, you’ll want to assess the situation. If the milk looks well blended and you don’t see any floating bits of nuts, you can pour it into a container and put it in the fridge.

If not, you’ll want to strain the mixture over a fine mesh strainer or cheesecloth, and then pour the resulting liquid into a storage container. This is just an extra step to make sure you don’t have any tiny bits of cashew floating around.

The milk only keeps for about four days in the fridge, so you’ll want to find ways to use it right away. I immediately thought of making vegan horchata. I love horchata, especially in the summer months when it’s so hot in St. Louis you can barely catch your breath. Today isn’t like that at all, but it is sunny and relatively warm, so horchata is definitely in order.

To make horchata, put a few ice cubes at the bottom of a glass. Sprinkle on about a teaspoon of ground cinnamon. Fill up the glass with your homemade cashew milk, stir, and then sprinkle a little more cinnamon on top. It’s easy, fresh, and delicious. I might pour myself another glass right now.

In the meantime, I’ll leave you with this song. I hope no matter where you are, you’re finding ways to make quarantine a little more bearable.

Posted in Drinks, Uncategorized, Vegan | Tagged , , , , , , , , , , , | Leave a comment

Chocolate Chunk Banana Bread

4417FE3B-2060-461E-8E5A-92DE2D52A619.JPG
We all need banana bread in our life right now.

There are few things as easy, or as comforting, to make. Plus, you can take advantage of your hoarding instincts. Buy too many bananas, let them go bad, and then make this banana bread.

I usually use the bowl of a stand mixer to whip up batter, but in this case, I mixed everything by hand. This banana bread is actually the easiest thing to make. You combine all the ingredients in a big bowl, stir with a spoon (mine was oversized and probably supposed to be used for tasting soup), and then pour it into a prepared loaf pan.

What is a prepared loaf pan? you might ask. Basically, it’s a loaf pan that has been sprayed down with canola oil within an inch of its life and then lined with parchment paper. I heard from one of my friends who owns a bakery in town that the best advice she ever got from one of of her former bosses was to always overspray. This advice has served me well.

Also, a trick for lining the pan with parchment paper is cutting it too thin, not thick. I think a lot of people (myself included) try to cut the paper to fit the very edge of the pan, but if you do that, you’ll always fail because the paper needs to fit snugly along the bottom. Try laying the piece of paper flat along the top edge, seeing where the inside line is, and cutting along that.

The best part about this bread is the smell. My whole apartment smells like banana chocolate paradise, which is a pretty good smell to have right now. I feel happy sniffing the air, which is even more important because I’m doing that 24/7 these days.

If you’re not a fan of chocolate chips (who are you), you can use chopped nuts or dried fruit in this bread. However, I’d recommend the chocolate route. I usually use chocolate chips, but I’m rationing them so I cut up a big bar of chocolate and sprinkled it in the batter. It’s my best combo yet.

Here’s a song to get you started on your banana bread journey. It made me cry yesterday. Just a friendly reminder to feel your feelings right now.

Chocolate Chunk Banana Bread

Ingredients

2 cups mashed ripe bananas (spotted or brown)
1/2 cup neutral oil (I used canola)
3/4 cup dark brown sugar
2 tsp vanilla extract
2 Tbsp ground flax seed plus 5 Tbsp filtered water
2 cups flour
1 tsp baking soda
1/2 tsp baking powder
3/4 tsp sea salt
4 oz bar of dark chocolate, chopped

Directions

Preheat your oven to 350 degrees F.

Mix all the ingredients except the chocolate together in a big bowl. Stir in the chocolate. Pour the batter into a prepared loaf pan (see blog post for instructions) and then smooth the top with a spatula.

Bake the bread on the top shelf of the oven for about an hour, or until the top is golden brown and cracked and it springs back to the touch. You can also test for doneness with a toothpick. Insert it into the middle of the loaf and pull it out. The loaf is done when there are only a few wet crumbs. Let it cool on a wire rack. Enjoy!

Posted in Bread, Breakfast, Uncategorized, Vegan, Vegetarian | Tagged , , , , , , , , , , , , | Leave a comment

Tips for Homemade Pizza

2D9F06C7-BE92-476C-B430-9BA9C40C0A95.JPG
I’ve loved making pizza at home for as long as I can remember. I mean, maybe not when I was eight and I thought that homemade pizza meant those bagged, bread-like crusts and sauce that squirted out of a plastic packet, but anytime after that.

A lot of people think that making pizza at home isn’t worth the effort. When you can get Domino’s delivered to your house in less than 30 minutes, why would you bother with an hour-plus long activity?

The answer is, quality. I know there’s a good argument for eating cheap pizza. I’m not above it. But take a look at all your pizza eating experiences, and ask yourself if you were as satisfied by a store-made pie or one made with more attention and fresher ingredients? Maybe you’re satisfied by the former, but that’s not the case for me.

During the coronavirus pandemic, I started dreaming about my favorite Neapolitan pies. I decided to make some pizza at home. I don’t have a wood-fired oven, obviously, so some of the flavor is automatically gone. But I do have a decent oven, a rolling pin, and flour. And to be honest, that’s really all you need.

I find this video to be extremely helpful for making pizza. It shows you how to shape the dough, which is probably the scariest part of pizza making for most people. You start by setting a ball of dough (homemade or store bought) on a floured surface for 30 minutes. Cover it with a clean tea towel to protect the dough while it sits.

Then, remove the towel and start rolling out the dough from the center, turning it occasionally so you get a nice, even circle. Once it’s about 1/2 inch thick, take it in your hands and carefully turn it like a wheel so it spreads a little. I want to emphasize carefully, because this is the part where things can get a little out of control. It wouldn’t be the end of the world if the dough tears because it gets too thin, but you want to avoid this situation if possible.

After that, I like to take my thumbs and pat a crust into the dough. All it takes is digging your thumb into the dough, not so hard that it rips, but hard enough that it leaves an indentation.

Then, you can throw on all your toppings. Some of my favorites are marinara sauce, mozzarella pearls, and basil leaves, and pesto sauce with mushrooms and cheese.

Recently, I experimented with using cornmeal for the crust. I know a lot of people do it, but I wasn’t sure if it would work for me. I was especially skeptical of using it as the base to bake my pizza in the oven. I thought the pizza dough would stick to the baking sheet, but I was wrong.

If you want to go the cornmeal route, spread a decent amount over a baking sheet, and then carefully place your pie on top. Sprinkle more cornmeal over the crust.

Then you can bake your pizza for about 20 minutes in an oven set at 475 degrees F. I start checking at 20 minutes. Sometimes the pizza needs to bake longer. A good test is how the cheese looks. If it’s slightly brown, melted, and bubbly, and the crust has a nice golden brown sheen, you can probably take it out of the oven.

Writing this has inspired me to start a pizza making class. Maybe I will when the world goes back to normal.

In the meantime, I’ll leave you with this song.

Posted in Pizza Break, Uncategorized | Tagged , , , , , , , , , , , , , , | Leave a comment